


7
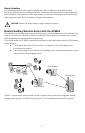
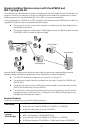
To set up the remote building wireless access:
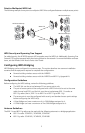
1 Make sure the AP8250 access points are running the latest
firmware.
To use WDS Bridging, the access points must be running firmware version 3.1.0 or later.
To download the latest firmware, go to the 3Com web site (www.3com.com).
2 Configure the access points with the same Radio and Encryption
settings.
Before physically installing the equipment, configure the access points with the same
Radio and Encryption settings. This configuration is done by connecting to the
Configuration Management System on the access point.
Note: For instructions on connecting to the Configuration Management System, see the
Wireless LAN Access Points User Guide.
a On the access point that is to be configured as the Root-Bridge, open the access point
Configuration Management System and click Advanced Setup.
b Open the Radio Settings page and set the following items:
Transmit antenna—set to the correct antenna port (usually port A, which is the port
that is closest to the LEDs). The transmit antenna must be set to the same port that
the antenna cable is connected to.
Radio Channel—disable the auto channel section, and set the desired radio channel
settings (for example, set the Radio Channel to 6).
SSID—set the desired SSID name (for example, set the SSID name to G Bridge).
c When finished, click Apply.
d Open the Security page for the G radio and set the following items:
Enable Encryption, choose AES as the Cypher Mode, choose WPA Pre-shared Key as
the Key Management, select Alpha Numeric as the Key Type, and enter a password
for the Pre-shared key (between 8 and 63 characters; for example, 3ComBridge).
Repeat steps on the Child Bridge G Radio.
e When finished, click Apply.
f Repeat steps a–e on the access point that is to be configured as the Child Bridge.
3 Configure the access points to establish the WDS link.
a On the access point that is to be configured as the Root-Bridge, open the access point
Configuration Management System and click Advanced Setup.
Open the WDS/STP Settings page and set the 802.11g radio to Root-Bridge mode.
Click the Scan for WDS
Link button. Highlight the access point that you want to link
to as the Child Bridge, copy the MAC address into the Child Bridge field, and then
click Apply.
b On the access point that is to be configured as the Child Bridge, open the access point
Configuration Management System and click Advanced Setup.
Open the WDS/STP Settings page and configure the 802.11a radio to Bridge mode.
Click the Scan for WDS Link button. Highlight the access point you configured as the
Root-Bridge, copy the MAC address into the Parent Bridge field, and then click Apply.
c Reboot the access points.
d On the Child Bridge, open the Configuration Management System, click Advanced
Setup, Status, and then AP Status. Verify the WDS link is active.
After the WDS link is active, the access points are ready for physical installation.