


Installation
5
Installation
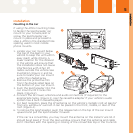
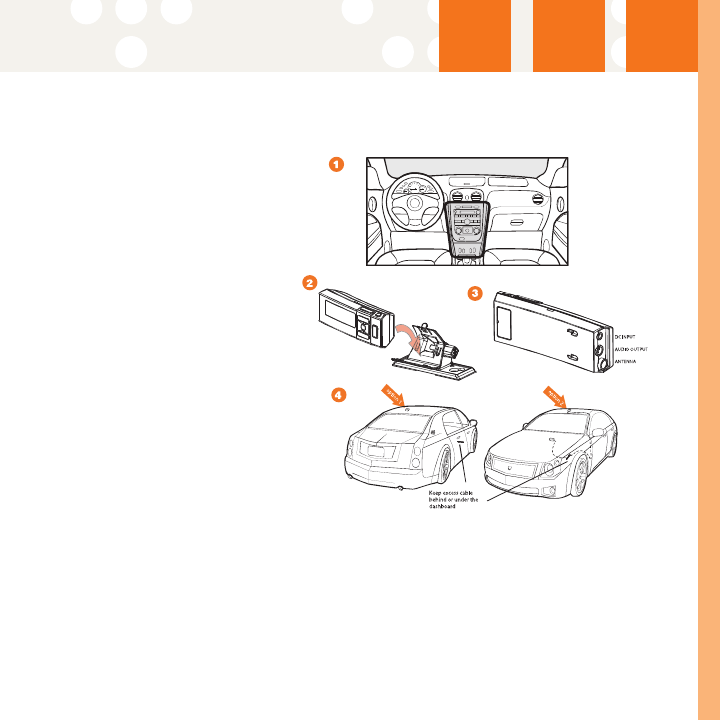
Mounting in the Car
If using the AMPs mounting holes
to fasten the Sportscaster car
mount to your console, Bolt or
screw the Sportscaster car
mount in place and proceed to
step 2. AMPs is the standard hole
spacing used in most mobile
phone mounts.
1. Locate your car mount below
the top of the dash in your
vehicle to keep the unit within
easy reach while driving. A
lower location for the receiver
in the vehicle will ensure that
the installation does not cause
interference with other FM
radios outside the vehicle. See
Illustration (Figure 1) and be
sure to locate your car mount
within the shaded area.
2. Remove the protective film
from the double sided tape on
the bottom of your car mount.
3. Push the Sportscaster into the
car mount until it locks into
place. (Figure 2).
4. Connect the DC Power, antenna and audio connectors (if required) to the
appropriate jacks. (Figure 3). Use the cassette adapter if your vehicle’s audio
system has a built-in cassette player.
5. For best reception, place the XMantenna on the vehicle’s metallic roof, at least 6”
from any window or sunroof. It can be placed in the front, middle, or rear of the
roof. (Figure 4).
6. To remove the Sportscaster, push the release tab on the top of the car mount
upward and pull the Sportscaster forward.
If the car is a convertible, you may mount the antenna on the metal trunk lid. It
should be at least 4” from the rear window. Ensure that the antenna and cable
don’t interfere with the opening or closing of the convertible top or the trunk lid.