


10
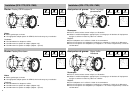
Tweeter: Swivel-flush mount
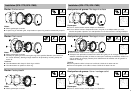
Installation (SPX-107R, SPX-137R, SPX-177R)
Haut-parleur d’aiguës : Montage pivotant à niveau
Installation (SPX-107R, SPX-137R, SPX-177R)
st4.2x9,5mm
Notes:
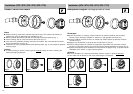
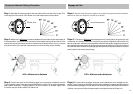
l Before mounting, insert swivel retention cup into housing. Then rotate until achieving a
positive lock using an appropriate tool (screwdriver, etc.).
l Mount complete swivel-flush cup with mounting clips first trough opening (Fig. 1).
l Press mounting clips at center and secure with screw (Fig. 2).
l Lock swivel ring to tweeter housing and make connections, then insert tweeter (terminals
first) into swivel-flush cup (Fig. 3).
l Fit tweeter into cup by rotating tweeter while pressing down (Fig. 4), then adjust for optimum
listening angle.
Caution:
l If custom painting is desired, remove grille by carefully pulling on mesh to release glue
without damaging diaphragm.
st4,2x9,5mm
Remarques :
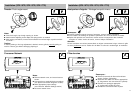
l Avant de procéder au montage, insérez l’embase de maintien pivotante dans le boîtier.
Tournez jusqu’à fermeture complète en utilisant un outil approprié (tournevis etc.).
l Insérez l’embase pivotante à niveau en faisant tout d’abord passer les attaches à travers
l’ouverture (Fig. 1).
l Appuyez sur les attaches au centre et fixez à l’aide d’une vis (Fig. 2).
l Fixez le collier pivotant sur le boîtier du haut-parleur et procédez aux connexions. Insérez
ensuite le haut-parleur (bornes en premier lieu) dans l’embase pivotante en surface (Fig. 3).
l Ajustez le haut-parleur dans l’embase en le tourmant tout en appuyant (Fig. 4). Ajustez ensuite
l’installation pour obtenir un angle d’écoute optimal.
Attention :
l Si vous souhaitez une couleur personnalisée, enlevez la grille en tirant prudemment
sur les mailes afin de libérer la colle sans endommager la membrane.
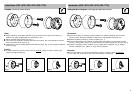
Fig. 1 Fig. 2 Fig. 3
Fig. 4
Fig. 1 Fig. 2 Fig. 3
Fig. 4