


Designing Touch Panel Pages
18
Color Passive-Matrix LCD Touch Panels
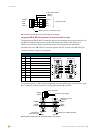
6. In the What To Send area, select one or more of the available options (All Bitmaps, All Icons,
All Fonts).
7. Select the mode of communication with the touch panel (RS-232 and AXlink). Confirm that
the correct panel is selected by verifying the ID values with the Base Address assigned to the
touch panel in the Protected Setup page.
8. After clicking Connect, the Available Panels list appears in the Available Panels field. Click
Begin to start downloading the project file into the panel.
9. After completing the download, the bitmaps, icons and fonts that were downloaded are now
accessible via the BITMAPS, ICONS and FONTS menus.
Creating a Bargraph and Joystick
Bargraphs are level monitors and adjustable level controls. These levels can be configured to
monitor and adjust audio outputs and lighting levels.
Joysticks are vertical and horizontal direction controllers you can use for camera for pan and tilt
control. Before you start, make sure to connect the touch panel to your Controller; otherwise, the
joystick will not work properly.
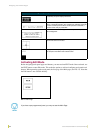
Adding a bargraph or joystick button\
Create a new button using the ADD operation bar in the BUTTON menu.
1. Press BUTTON in the Edit bar to open the BUTTON menu.
2. Press PROPERTIES in the BUTTON menu to open the PROPERTIES operation bar.
3. Press any button to open the Button Properties page.
4. Press BUTTON TYPE to open the BUTTON TYPE menus. Choose a button type to open its
Button Properties page.
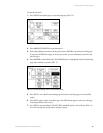
Setting Bargraph and Joystick Properties
Use the Button Properties page to set channel, level, and button colors. Refer to the Setting the
variable text code section on page 16 and the Setting the channel code section on page 15 for
further information. Refer to the Setting the button colors for channel-off conditions section on
page 17 for more information on colors for channel-off conditions.
Setting the level code
Level buttons set the device and number codes for the touch panels.
1. Press DEV to open a keypad and set the device number.
2. Enter 1, 2, 3, or 4 in the keypad. The programming software uses device codes
1 - 4 to identify the touch panel.
3. Press ENTER to save the level device number, close the keypad, and return to the Button
Properties page.
Joysticks actually use two level numbers. The first is for the X-axis and the second is
for the Y-axis. You only need to specify the first level.