


12
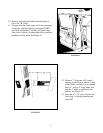
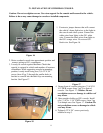
7. Release video screen from locked position. Lower video screen to viewing position for access to mounting
locations in top of video system housing.
8. Raise video system into approximate position and connect all wiring to components. Route video cable
through hole in mounting bracket. Connect wiring and cabling to video system per instructions included
with video system.
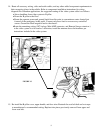
9. Check function of all components and lights. See operating instructions for video system operations check.
For further assistance, refer to the video system manual for the technical support phone number listed for
your area.
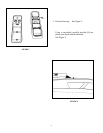
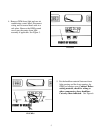
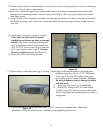
10. Insert video system into opening in console.
Note: Make sure that wires do not get
pinched between bosses on video system and
console. Align holes in housing with threaded
clips in mounting bracket. Loosely install four
(4) 6-32 X 3/4" screws (item 10 pg 2) and four
(4) 3.5 mm washers (item 11 pg 2). Caution:
Do not overtighten screws. See Figure 19.
11. Raise video screen into locked position.
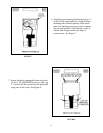
12. Attach wiring to rear light (item 6 pg 2) per step 1. Install light in console and secure to plywood above
headliner using three (3) # 8 x 2 1/2" PFH screws
(item 2 pg 2). See Fig. 20. Tighten screws until
rear edge of console contacts headliner. Caution:
Do not overtighten screws or damage to vehicle
roof may occur.
13. Install trim ring (item 7 pg 2) around light.
14. Attach O.E. wiring to rear A/C control head.
Carefully snap O.E. trim ring around control head.
Insert control head into opening and press firmly to
engage tabs.
15. Check function of all components and lights. If O.E. console was equipped with a Homelink
transmitter, refer to the vehicle owner’s manual for reprogramming instructions.
Figure 20
Figure 19