


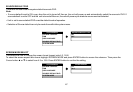
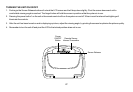

OVERHEAD DOME LIGHTS
The Dome Lights integrated into the unit are controlled by a three position slide switch. Sliding the switch to the ON position will turn
the lights ON. The OFF position will prevent the lights from turning ON with the vehicle's interior lighting, and the auto position will allow the
lights to turn ON and OFF with the vehicle's interior lighting. Refer to the Installation Guide for wire connections. Do not leave the vehicle
unattended with the dome light switch in the ON position, as this could result in a discharged battery.
ACCESSORIES
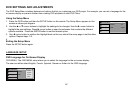
WIRELESS HEADPHONES
SOURCE FEATURE
The VOD10 includes a built-in infrared transmitter for use with the supplied wireless headphones. The headphone volume is adjusted
using the controls on each headset. Any number of wireless headphones may be used but they must be used within a line of sight from the
transmitter, as infrared transmissions, like visible light travel only in a straight line. See the documentation accompanying your wireless
headphones.
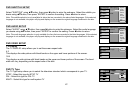
AV1
The AV1 input may be connected to a external video source, video game system, or other audio / video devices. To access the audio / video
inputs, inputs, turn the unit on and press the S (source) button or the Source button on the remote control until "AV1/AUX" is displayed on the
screen. Turn the video source component on with its power button or remote control and it is now ready to play the audio and video signals from
the source connected to AV1.
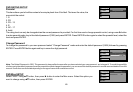
AUX
The unit will accept an audio / video input through the 3 RCA jacks located on the rear of the unit. The audio / video device could be a
video game system, video camera, or other input device. To access the audio / video inputs, inputs, turn the unit on and press the S
(source) button or the Source button on the remote control until "AV1/AUX" is displayed on the screen. Turn the video source component
on with its power button or remote control and it is now ready to play the audio and video signals from the source connected to AV1. The
same time AV1 video and audio will be cutoff.
AV Out
The unit provides an AV output for optional video monitor(s). This output will provide the AV signals that duplicate the picture/audio being
processed by the unit to an additional monitor or video display. Please see your installer for more information.
23