


3
I. PREPARATION OF VEHICLE INTERIOR
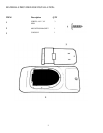
1. Carefully trim headliner as shown.
Caution: Before cutting headliner material,
check for wiring or other componentry
above headliner. Cut only where indicated.
Make sure that the 8 1/2" cut is centered left to
right in vehicle. See Figure 1.
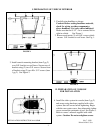
2. Remove and retain (2) two O.E. screws which
secures O.E. bracket to roof brace. See Fig. 1.
3. Install console mounting bracket (item 2 pg 2)
over O.E. bracket on roof brace. Secure rear of
bracket using (2) two O.E. screws. Secure front
of bracket using (2) two #8 x 3/4" screws (item
1 pg 2) See Figure 2.
II. PREPARATION OF CONSOLE
FOR INSTALLATION
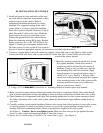
4. Install the video system in console (item 3 pg 2)
and secure using hardware supplied with video
system. Start all screws before tightening. Begin
with the rear center screw, then alternately tighten
screws around the perimeter of pod. See Figure 3.
Refer to owner’s manual supplied with video
system. Caution: Do not overtighten screws.
INSTALLATION INSTRUCTION # 44-0026B July 7, 1999
Printed in the U.S.A.
FIGURE 1
FIGURE 2