


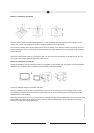


Method 1: Installation with Stand
Mount at first the stand at an appropriate postion. F.i. in the dashboard with the supplied screws. Observe by any
means, that you don´t damage wires, cables or other preinstalled parts in the vehicle.
At first remove carefully the mounting frame of the monitor´s rearside. Then slide the monitor´s mounting slot (A) on
the fixing plate (B) from the mounting stand. Ensure thereby a propper allignment of the fixing plate in the mounting
slot and don´t tilt.
Adduct the knurled head screw (C) of the stand, after you have found the right position by sliding around. The vie-
wing angle if the monitor could be adjusted by setscrew (D).
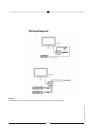
Method 2: Installation in Headrest
Thereby a installation with the mounting frame (A) is suggsted. At first consider the right position of the seperate A/V
distribution box, especially when a additional second monitor should be installed.
Ensure for suffizient lenghts of all cables and wires.
Cut out a suffizient mounting hole in the headrest (B). Use the inner dimensions of the mounting frame as draft.
Then lead the A/V-Cable from the monitor through the big hole (C) in the mounting frame and through the hollow
attachment bar of the headrest.
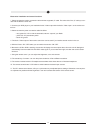
Depending of the type of your car, you should fix the mounting frame(D) with the attachment bars on the inside. Then
insert carfully the monitor in the mounting frame. After all, slide the headrest back into the seat and connect the
Monitors A/V-cable with the distribution box.
15
Subject to technical changes