


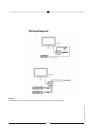


Electronical installation and control functions
1. Please connect the monitor connection cable with the supported „S“ cable. The other side of the „S“ cable you con-
nect with the Monitor control box.
2. Connect your DVD player or your headunits Audio / Video output with the Audio / Video input 1 at the monitor con-
trol box.
3. Please connect the power connection cable like follow:
- red: ignition DC 12V or with the automatic antenna output of your Radio
- yellow: DC 12V permament power
- black: DC ground
4. The Audio / Video output of the monitor control box can be used if you install a second monitor in the car.
5. With the Power ON / OFF button you can switch the monitor ON / OFF.
6. Be sure the VCD or DVD is working, the monitor will display the normal photo then, this main unit will distinguish
automatically from the model PAL and NTSC video signal. If you connect them right, the clear and colorful screen
will be on.
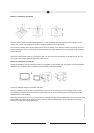
7. Using the remote conrol you can adjust the brightness, color and contrast.
8. The remote key of overturn can turn the picture clockwise. It fits to different occasions.
9. The monitor included a built in IR headphone transmitter which allows the use of wireless headphone.
10. The remote control button V1/V2 allow to switch between the booth input sources.
11. The P.P. remote control button, offer you a quik access to pre adjusted picture settings. Otherwise a manual pictu-
re adjustment is possible with the brightness / color and contrast ratio buttons of the remote control.
17