


44
44
4
UNIVERSAL INSTALLATION AND IMPORT CAR INSTALLATIONUNIVERSAL INSTALLATION AND IMPORT CAR INSTALLATION
UNIVERSAL INSTALLATION AND IMPORT CAR INSTALLATIONUNIVERSAL INSTALLATION AND IMPORT CAR INSTALLATION
UNIVERSAL INSTALLATION AND IMPORT CAR INSTALLATION
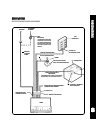
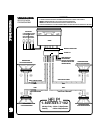
4. Wire the Radioto theVehicle's Wiring:
A. Place radio in front ofdashboard opening so that wiring can be brought throughthe mounting sleeve.
B. Carefully follow the diagrams on pages 8 and 9 or 10 to wire the radio, making certain all connections
are secure and insulated with wire nuts or electrical tape to insure proper operation of the unit.
C. After completing the wiring, re-attach the front panel to the chassis and turn the unit on to confirm
operation (ignition switch must be "on"). If unit does not operate, re-check all wiring until problem
is corrected.
D. Once proper operation is achieved, turn off ignition switch, remove front panel, and proceed with
final mounting of the radio.
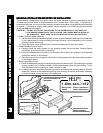
5. Installing the Radio inthe Mounting Sleeve:5. Installing the Radio inthe Mounting Sleeve:
5. Installing the Radio inthe Mounting Sleeve:5. Installing the Radio inthe Mounting Sleeve:
5. Installing the Radio inthe Mounting Sleeve:
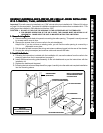
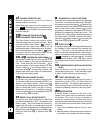
A. Carefully slide the radio into the mounting sleeve until it is fully seated and the side spring clips snap
in place.
B. Attach one end of the perforated strap (supplied) to the screw stud on the rear of the radio using
the hex nut provided.
C. Fasten the other end of the perforated strap to a secure part of the dashboard either above or below
the radio using the screw and hex nut provided.
CAUTION: The rear of the radio must be supported with the strap to prevent possible damage to the
dashboard from the weight of the radio or improper operation of the radio due to vibration.
D. Re-attach the front panel to the chassis and check operation of the unit by referring to the Operating
Instructions section of this manual.
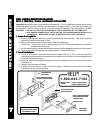
6. Removing the Radio:
A. Should it be necessary to remove the radio for servicing or other reasons, first remove the
detachable front panel.
B. Remove the rear support strap by taking off the hex nut securing it to the screw stud on the rear
of the chassis.
C. Usethe 2 removal tools(supplied) to disengage thespring clips and pullthe radio out ofthe mounting
sleeve.
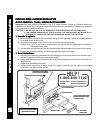
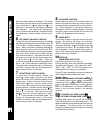
PERFORATEDSTRAP
HEXNUT
BENDTABSTOSECURE
SLEEVETODASH
SLIDERADIOINTOSLEEVE
SCREWSTUD
BENDBOTTOM
TABSDOWNWARD
BENDTOP
TABSUPWARD
HEXNUT
UNIVERSAL INSTALLATION AND IMPORT CAR INSTALLATIONUNIVERSAL INSTALLATION AND IMPORT CAR INSTALLATION
UNIVERSAL INSTALLATION AND IMPORT CAR INSTALLATIONUNIVERSAL INSTALLATION AND IMPORT CAR INSTALLATION
UNIVERSAL INSTALLATION AND IMPORT CAR INSTALLATION