


-2-
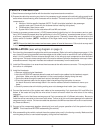
HR7DD PKG SYSTEM OVERVIEW
1) When both monitors are selected as AV1, there will be no sound output and screen will be black.
2) M1 will display all of the functions including the FM modulator selection with the comprehensive OSD. FM
functions may also be turned off by selecting the FM ON/OFF button on the remote control.
3) The HR7DDPKG system is supplied with two IR Headphones (P/N IR2CHS). The headphones have an A-B
switch that allow the users to select the audio from either the M1 (CH A) or the M2 (CH B).
4) Using different IR codes, M1 will only respond when the remote control set to M1and M2 will respond only
when the remote control set to M2. Each operates independently of the other.
5) There are 1/8" Headphone Jacks on M1 and M2 that can be used with any standard wired stereo headphones.
These jacks are controlled by the volume up/down buttons on the remote control.
(NOTE: Be sure to unplug the 1/8" Headphone plug and / or AUX input plug when opening either M1
or M2 to insert or remove a disc to prevent damage to the unit.
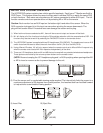
6) Pivot the screen until a comfortable viewing angle reached. The internal lock limits the screen to a
maximum adjustment of 30 degrees from closed position, the headrest itself can be tilted forward
to help achieve a comfortable viewing position.
9) Insert Disc 10) Eject Disc
Insert
Disc
Eject
Disc
Internal Lock
30 degrees
POW ER
SCR EEN
MODE AUXPLAYSTOP
AUX
Input
SOURCE
M2
POW ER
SCREEN
MODEAUXPL AYSTOP SOURCE
M1
POWER
SCREEN
MODE AUXPLAY STOP SOURCE
M1
POWER
SCREE N
MODE AUXPLAY STOP
HEADPHONE
JACK
SOURCE
M2
(M1/M2)
(M1/M2)
The HR7DDPKG system contains two vehicle specific headrests. Each has a 7" Monitor and built-in
DVD Player. This system allows the users to either watch individual DVD’s or watch the same DVD
on both monitors. Both users can also share an A/V source connected to either AUX input. The full
function remote control can operate either unit by selecting MI or M2 on the remote.
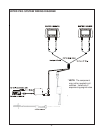
Caution: Each monitor has an AUX input on the bottom right hand side of the screen. When the
AUX connector is plugged in to this input use care when pivoting the screen downwards. The
plug will limit screen travel. Excessive force can damage the screen and/or plug.