


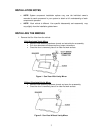
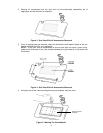


5. Using a Razor Knife cut an “X” through the material.
Figure 5. Cutting The Visor Material
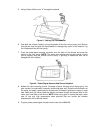
6. Peel back the 4 flaps. Carefully cut out the plastic of the visor using a rotary tool. Be sure
that the tool does not grab the fabric/leather or damage may occur to the material. Lay
the 4 flaps back into the visor cavity.
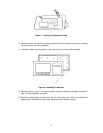
7. Push the power/signal harness connector thru the back of the shroud and press the
shroud in the visor cavity. NOTE: The cavity may require some grinding using a rotary
tool to properly seat the shroud into the cavity. If grinding is needed be sure not to
damage the visor material.
Figure 6. Power/Signal Harness And Shroud Installed
8. Adhere the visor mounting shroud. (Example: silicone, two part quick drying epoxy, hot
glue, screws if a double wall is present, double side tape, etc) Place the shroud back into
the cavity and apply a good amount of pressure to the base if glue tape or epoxy is used
sets. Make sure you have pulled the monitor connector through the access hole on the
lower right hand side of the shroud. NOTE: When using glue or double side tape, make
sure to use only high temperature rated products that can handle the extreme
temperatures of the vehicles interior
9. Plug the power power/signal harness into the rear of the MMSV58.
5