


128-7472
6 of 16
-6-
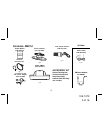
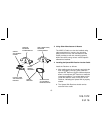
Setting Up and Installing Your Kit
NOTE: The XM signal can be received and processed
virtually anywhere as long as there are no
obvious satellite signal obstructions such as
nearby buildings, high terrain, parking garages
or tunnels.
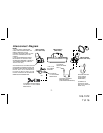
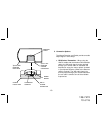
1. Cabling Interconnections
You can begin to enjoy XM
®
Satellite Radio as
soon as the Xpress XM
®
Receiver and Vehicle
Kit installation are complete. Set up your Audiovox
Xpress XM
®
System using the following
installation instructions, or enlist the help of a
professional installer:
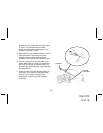
2. Installing the Cradle Mount Base Assembly
a. Interconnect all of the components as shown
on the adjacent page to verify that the system
operates normally.
b. Locate a firm, reasonably flat surface within your
car to permit optimum viewing and line-of-sight
access by the supplied remote control unit.
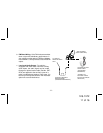
Installation/Wiring Precautions
1. To prevent a short-circuit, be sure to turn off the
ignition and remove the negative (-) battery cable
prior to installation. Connect power wires last.
2. Do not install the unit in the locations exposed to
direct sunlight or, in areas subject to extreme
temperatures.
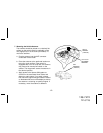
3. Incorrect installation may cause damage to the
system. Mount the unit firmly in place, using
the supplied hardware.
4. Be careful not to damage the vehicle wiring.
5. Be sure to use the supplied screws and washers.
6. Be careful not to snag any wires when tightening
screws.
7. Use only the 12 Volt-to-5 Volt DC Power Adapter
supplied. Use of an alternative power adapter may
damage the Xpress XM
®
unit and/or the XMC10
cradle.
CAUTION: You could drain the vehicle battery if
the DC power adapter remains
plugged in after the ignition is turned
off. Unplug the adapter to prevent
this possibility.