


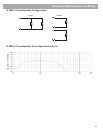
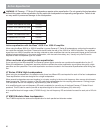


31
Service Information
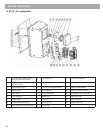
11. Slowly and gently rotate the diaphragm assembly so that the coil is worked into the gap in the front of the compres-
sion driver, is centered in the gap, and the diaphragm assembly rests smoothly against the front plate of the compres-
sion driver. The screw holes in the diaphragm can be visually lined up with the screw holes in the front of the
compression driver assembly to help center the coil into the gap.
12. Align the holes in the diaphragm assembly with the holes in the front of the compression driver assembly.
13. Place the rear cover back on by aligning the three screw holes and the three post holes.
Note: Make sure the assembly fits together, is flush, and the holes align.
14. Place a screw with lock washer into each of the three holes.
15. Apply a sine-wave to the driver at a frequency of 300Hz and a maximum amplitude of 2 volts.The unit should produce
a tapping sound, not a buzzing sound. If you hear a buzzing sound, center the diaphragm coil in the gap until the
buzzing sound goes away.
16. Slowly tighten the three screws, alternating turns so there is even pressure on the back cover. If you hear a buzzing
sound as you tighten, back off the screws until the buzzing sound goes away. Resume tightening the screws, paying
attention to alternately tightening each screw the same number of turns. Tighten each screw to a maximum torque
setting of 25 inch-pounds.
17. Sweep the frequency of the sine-wave from 300Hz to 1kHz and listen for buzzing. If you hear buzzing, readjust the
diaphragm or clean the gap again. Dirt and/or misalignment of the diaphragm causes buzzing. Continue sweeping the
frequency until you do not hear any buzzing. The driver is ready to use.