


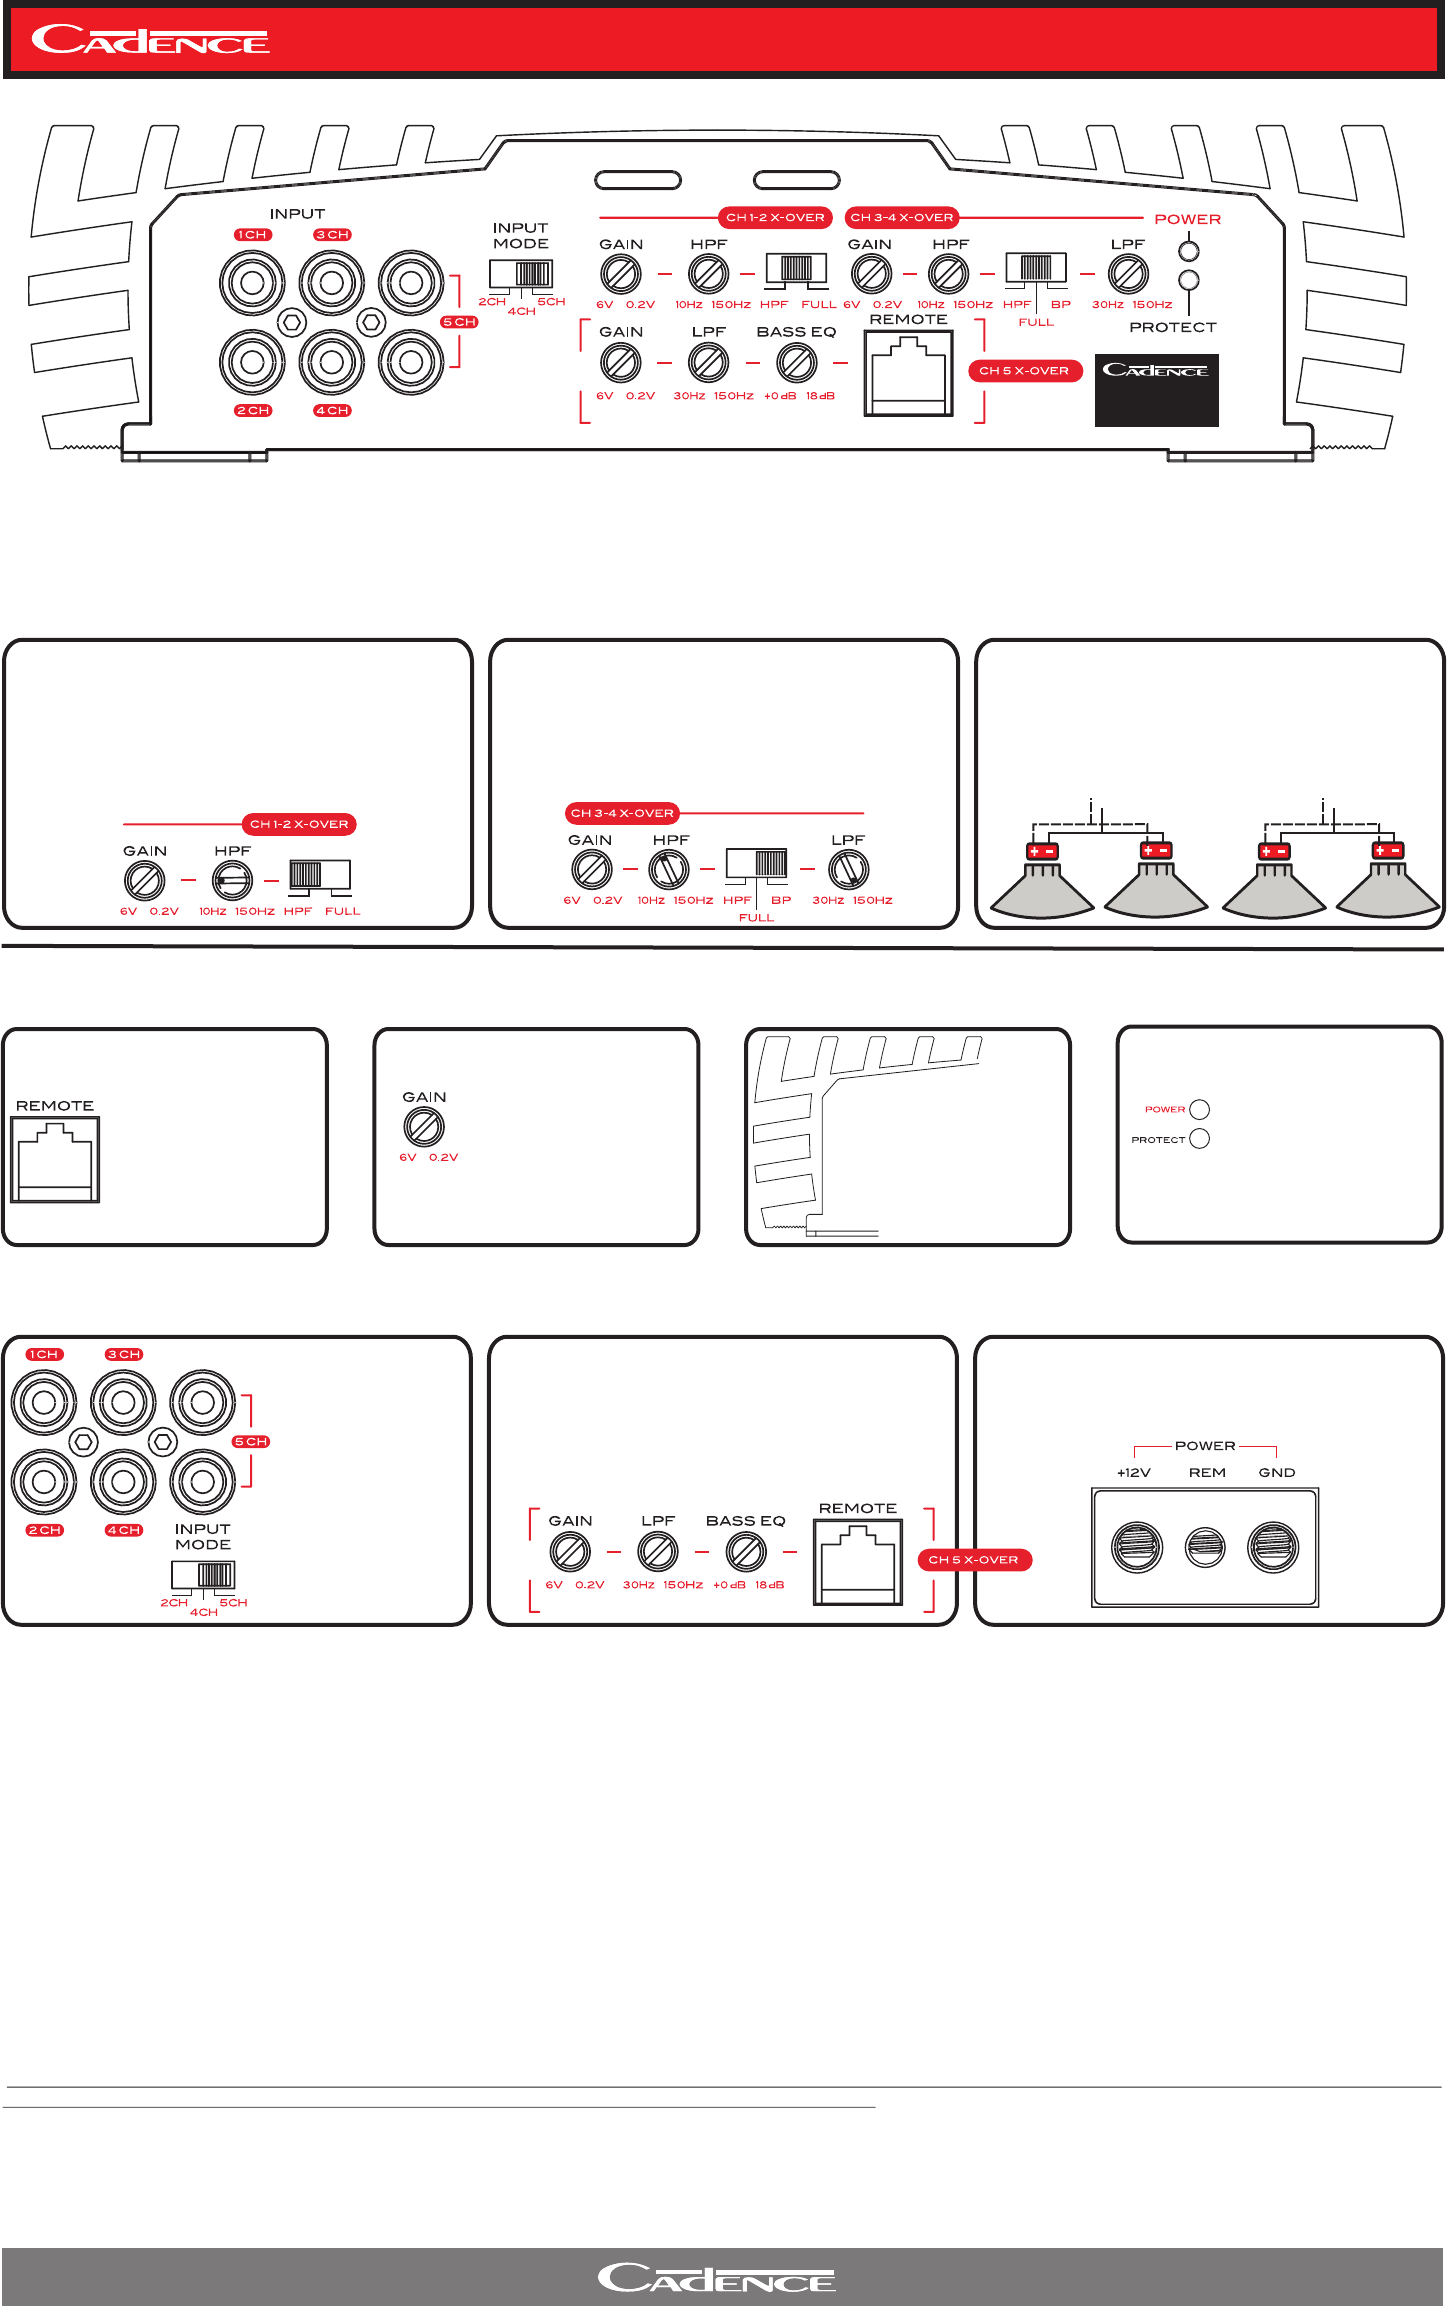
ZRS C8 CONTROLS
Band Pass Configuration.
The ZRS C8 features a unique band pass system where by channels 1 and 2 can be configured high pass or full range while separately
setting channels 3 and 4 to their own band pass frequencies. This band pass system is especially useful when installing multiple midrange
and tweeter speakers. Please see below for detailed instructions.
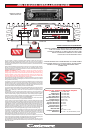
The ZRS C8 amplifies
features advanced input
gain control from 0.2 volts
to 6 volts so that it can
operate efficiently and at
full power from any head
unit pre amp signal.
INPUT
GAIN CONTROL
ZRS amplifiers feature
s o p h i s t i c a t e d I C
controlled protection
circuitry. If the amp goes
in t o a dia gno stic
condition from thermal
over load or speaker short
circuit the LED will light
and amp will shut down.
POWER & DIAGNOSTIC
LED INDICATORS
Channel 5 electronic crossover features sophisticated
Linkwitz-Riley 24dB Low Pass filter circuitry. The 24dB
filter ensures a steep cutoff of high frequencies and
assists the amplification circuitry emphasize its power
output in the set frequency range thereby increasing the
audio spectrums headroom. Channel 5 is a mono 2 ohm
stable channel.
24dB LOW PASS
CROSSOVER SLOPE
CONNECTION
TERMINALS
Before you begin with your installation, disconnect the NEGATIVE (-) terminal from your car's battery. This safety precaution will avoid possible short circuits while wiring your amplifier.
Cadence amplifiers operate on 12-volt negative ground systems only.
It is recommend that you layout your sound system design on paper first. This will help you during the installation so that you will have a wiring flow chart and not miss-wire any of your
components.
Mount the amplifier in the trunk or hatch area of your vehicle. Never install an amplifier in the engine compartment or on the firewall. Please be sure to leave breathing room around the
amplifier heat sink so that it can dissipate the heat it produces efficiently. The amplifier can be installed either horizontally or vertically.
When mounting the amplifier on the trunk floor, be sure to watch for your gas tank, gas lines and electrical lines. Do not drill or mount any screws where they might penetrate the gas tank of
your car.
Once the system is operational, the first thing to do, is set all crossover points to approximate settings. In the case of the basic sub woofer system Low Pass filter crossover at 100 Hz or so.
Set the Bass Boost equalizer controls to 0 dB ( Flat Switch Position.)
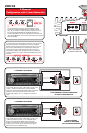
Now you should set the amplifiers Input Sensitivity adjustment. The knob accessible on the side of the amplifier marked INPUT GAIN adjusts the input sensitivity from 300mV to 7Volts.
To adjust the input sensitivity, turn the control using a small flat head screwdriver fully counter clock wise to the minimum position. Do not apply any pressure while turning as this might
break the control unit. Adjust your radio volume level to maximum volume. Now turn the level control on the amplifier clockwise towards the Maximum marking until audible distortion
occurs. When you begin to hear any distortion in the sound, back down one notch and your amp is set. It is helpful to have a second person to help you set the gain.
When setting up a multi-amp system, set each amplifier’s gain separately. Start off with the bass amplifier, then adjust the highs amplifier’s level control to match.
Once you are satisfied with the level control settings, use any equalizer controls to adjust the system tonal level for personal preference. Keep in mind that after equalizing, you may have to
go back and reset the amplifiers level controls.
The level control of any car amplifier should not be mistaken for a volume control. It is a sophisticated device designed to match the output level of your source unit to the
input level of the amplifier. Do not adjust the amplifier gain to maximum unless your input level requires it.
Your system can also be extremely sensitive to noise when the LEVEL is set to maximum and does not match your input signal. The gain adjustments need to be made only once when first
setting up the system.
If your unit has been professionally installed please do not change the gain settings set by the installer, he is the professional!
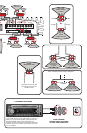
Set Channels 1 and 2 Crossover Switch to HPF (High
Pass Filter) and adjust the HPF (High Pass Filter) knob to
the frequency you wish to choose to block low frequency
signals. In the drawing below we set the knob to
approximately 40Hz. Now channels 1 and 2 will only play
signals above 40Hz. You can also choose to set
Channels 1 and 2 to Full Range by changing the switch
position to FULL.
Set Channels 3 and 4 Crossover Switch to BP (Band Pass)
and adjust the HPF (High Pass Filter) knob to the frequency
you wish to choose to block low frequency signals. In the
drawing below we set the knob to approximately 80Hz. Set
the LPF (Low Pass Filter) to the frequency you wish to choose
to block high frequency signals, we chose 150Hz. Now
channels 3 and 4 will only play signals between 80Hz and
150Hz.
4-Ohm
Midrange
4-Ohm
Midrange
4-Ohm
Midrange
4-Ohm
Midrange
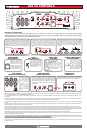
The Band Pass Setting is especially useful when setting
up component speakers where you want to activly block
low frequencies from reaching your midrange speakers
and tweeters and for multiple midrange speaker
installations. When installing a 3-way speaker system
the ZRS C8 is the perfect midrange/midbass power
amplifier.
If you have 1 pair of
RCA jacks, input them
in to 1CH and 2CH
then set the switch to
2CH. If you have 2
pairs of RCA jacks,
input them in to CH,
1,2,3 and 4 then set
switch to 4CH. If you
have a subwoofer
R C A f r o m y o u r
headunit, it should go
to 5CH.
The ZRS C8 features heavy duty bolt down terminals,
the power and ground terminals accept 4 gauge wire
while the speaker terminals can accept 10 gauge wire.
Super heavy-duty heatsink
guarantees that your amplifier
will stay cool no matter how
h a r d y o u p o u n d i t .
Com put er ize d ther mal
protection circuitry guarantees
the amplifiers stability.
HEAVY DUTY
HEATSINK
DASH MOUNT
BASS REMOTE
Channel 5 is the mono
subwoofer channel and
comes equipped with a
d a s h b oa rd v o l u m e
remote control which can
be installed near the dash
for your convenience in
controlling the subwoofer.
RCA PREAMP
INPUT MODE SELECTOR