


SA-430-17 Installation and Operating Instructions Page 7 of 15
08/05/08 CP5010A
MOUNTING – Amplifier
Select a location for the amplifier in an area such as the driver compartment firewall, under a
seat, etc. Mounting the amplifier in the engine compartment or in an area directly exposed to
weather is not
recommended. Assure adequate ventilation to prevent overheating. Allow
clearance for wiring and radio adjustment. Inspect behind mounting area for clearance. Mark
the location of the mounting holes to be drilled.
Drill 4 holes (up to 1/4" diameter) to mount the amplifier to the vehicle. Install the terminal
block plug and make all electrical connections before final mounting (See ELECTRICAL
CONNECTIONS – Amplifier). The plug is secured with the two locking screws. Then mount
the amplifier to the vehicle using appropriate hardware (not supplied).
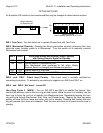
MOUNTING – Control Head
Select a mounting location in an area such as the dash or overhead console. Choose a
mounting location convenient to the operator and away from any air bag deployment areas.
Inspect behind mounting area for clearance. Allow 1¾” of depth to accommodate the control
head and cable(s). Consider wire routing and access to connections, as well as microphone
bracket placement.
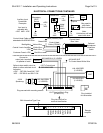
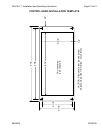
Use template (back page) for marking hole and cutout locations. Connect control head cable
to back of unit and route leads through cutout. Make all electrical connections (See
ELECTRICAL CONNECTIONS – Control Head), and then use #6 screws for mounting the
control head (not supplied).
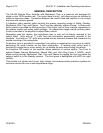
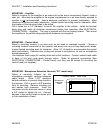
MOUNTING - Microphone Extension Harness (“FX” model only)
Select a mounting location for the
microphone connector, verifying adequate
cable length. Allow 1-3/4" clearance
behind connector to prevent sharp bends in
the harness. Drill or punch a 5/8" diameter
hole for mounting. Remove mounting nut
and washer from connector. Insert the
connector into the hole and secure it using
a 3/4" socket to tighten the nut. Connect
harness to the control head as shown prior
to final installation of head.
Control Head – Rear View
Microphone
Extension
Cable