


WIRING PRECAUTIONS
Read all wiring precautions. If you are not sure of the connections, contact your
authorized Clarion dealer.
1. Disconnect the negative (-) lead of the battery before making any power
connections.
2. When creating passage holes for the power wires, use grommets to elimi-
nate any sharp edges created during drilling. This will protect the wire from
being nicked and causing a short circuit.
3. When connecting the ground lead, fasten the ground lead (black) securely to
a clean metal plate on the vehicle.
NOTE: The OHM642 monitor displays video images only. It does not provide
audio output. Refer to the owner's manual of the connected device for informa-
tion on audio output.
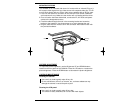
INSTALLATION
The OHM642 is an overhead, fold-down 6.4" monitor with an Infrared (IR) eye.
It will accept a video signal from any video source with composite video out.
The IR eye will work directly with any Clarion video source product with an IR
Eye Input.
1. Look over the vehicle for a location for the monitor. Each vehicle is different
and locations will vary. Make sure the monitor will not interfere with the
driver.
2. Once a location has been determined, connect the IR, A/V RCAs and
power cables to the designated sources.
3. Feed the cables through the hole in the mounting bracket and screw the
bracket to the headliner. Use short screws so as not to damage the roof.
4. Plug the cable into the monitor's 8 Pin Din connector. Mount the monitor
with the provided hardware.
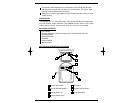
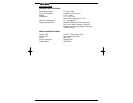
OHM642
POWER CONNECTOR
IR REMOTE OUT
AUDIO R INPUT
AUDIO L INPUT
VIDEO INPUT
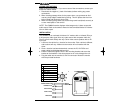
8 Pin DIN Mini Connector
1 DC 12V
2 IR Out
3 DC 12V Ground
4 Video Input
5 A/V Signal Ground
6 Audio R Input
7 ACC Control
8 Audio L Input