


7
VRX775VD
5
VRX775VD
6
VRX775VD
English
Owner’s manual
English Français Español
English
Owner’s manual
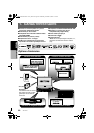
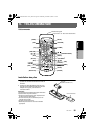
3. CONTROLS/COMMANDES/
CONTROLES
[
BAND
]
[
E
][e]
[
ISR
]
Sensor
[
P
]
[
ADJ
]
[
SRC
]
[
MONI
]
[
iPod
]
[
MENU
]
[
MAP
]
Note: Be sure to unfold this page and refer to the front diagrams as you read each chapter.
*The control panel can be detached to prevent theft. For details, see the pages entitled “7. DCP”.
Remarque: Veuillez déplier cette page et vous référer aux schémas quand vous lisez chaque chapitre.
* Le panneau de commande peut être détaché de l’unité pour éviter tout vol. Pour plus d’informations,
reportez-vous au chapitre “7. CLAVIER DE COMMANDE AMOVIBLE”.
Nota: Cuando lea los capítulos, despliegue esta página y consulte los diagramas.
* Puede extraer el panel de control para evitar que lo roben. Para obtener más información, consulte las páginas
del apartado “7. Panel de CONTROL DESMONTABLE (DCP)”.
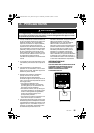
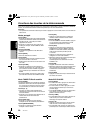
4. NOMENCLATURE
Names of Buttons
Note:
• Be sure to read this chapter while referring to the
front diagrams for chapter “3.CONTROLS” on
page 5 (unfold).
[E], [e] buttons
• Use these buttons to increase/decrease the
volume.
[p] button
• Press this button to enter the play pause mode
in the DVD PLAYER/iPod/changer modes.
Press the button again to resume playback.
• Keep pressing this button more than 1 second
to mute the sound in the DVD PLAYER/iPod/
changer modes.
• Press this button to mute the sound in the
TUNER/Satellite Radio/TV/VISUAL modes.
[SRC] button
• Press this button to turn on the power. Keep
pressing this button more than 1 second to turn
off the power.
• When the liquid crystal panel is closed, press
this button to change to the next mode such as
TUNER mode.
• When the liquid crystal panel is open, press
this button to display the Source menu screen
to switch the mode.
[R], [F] buttons
• Use these buttons to change to the previous/
next preset station in the TUNER/Satellite
Radio/TV modes.
• Use these buttons to select a track in the CD,
Video CD, MP3/WMA, iPod and CD changer
modes.
• Use these buttons to select a chapter in the
DVD video and DVD changer modes.
Sensor
• Receiver for the remote control unit (operating
range: 30° in all directions).
[BAND] button
• Press this button to switch the receiving bands
for TUNER/Satellite Radio/TV modes. Keep
pressing this button more than 1 second to
switch the Seek/Manual tuning modes.
• Use this button to move to the first track in the
CD, Video CD and iPod modes, or the first
chapter in the DVD video mode.
• Use this button to move to the next folder in the
MP3/WMA mode.
• Use this button to switch to the next disc in the
changer modes.
• Keep pressing this button more than 1 second
to play all tracks in the iPod mode.
[iPod] button
• Press this button to switch to the iPod mode.
[MAP] button
*1
• Press this button to show the Map screen of the
current location in the Navigation mode.
• Pressing this button in the audio/visual modes
changes to the Navigation mode.
•
Pressing this button switches the liquid crystal
panel to a Visual input screen to lock the monitor
(To enable this function, go to the GENERAL
menu (within the ADJUST menu), and set the
CONNECT item to “
NAVI
” or “
OTHER
”).
[MENU] button
*1
•
Pressing this button in the Navigation mode
shows the Menu screen of the Navigation system.
•
When the menu screen of a DVD video/Video CD
is displayed, pressing this button displays the Key
Pad on the screen. When the other screen than
the menu screen is displayed, keep pressing this
button more than 1 second to display the Key Pad.
[ADJ] button
*1
• Press this button to enter/exit the ADJUST
mode to change the settings.
[MONI] button
*1
• Press this button to enter/exit the Monitor
Adjust mode.
•
Keep pressing this button more than 1 second to
turn off the back light of the liquid crystal panel.
[ISR] button
• Use this button to enter/exit the ISR (Instant
Station Recall) standby mode.
• Keep pressing this button more than 2 seconds
to store the current station into ISR memory in
the radio mode.
* The [ISR] button is disabled when the SUB
zone is selected in the 2-ZONE mode.
[o] (EJECT) button
• Use this button to eject the disc set in this unit.
[P] (OPEN) button
• Use this button to open/close the liquid crystal
panel.
• Keep pressing this button more than 2 seconds
so that the liquid crystal panel is positioned
horizontally when the liquid crystal panel is
open (Air Conditioner Operation mode).
•
When the liquid crystal panel is closed, keep
pressing this button more than 5 seconds to
perform the panel calibration function to memorize
the maximum angle of the liquid crystal panel.
Note:
*1: This button does not work when the liquid crystal
panel is closed.
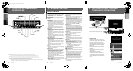
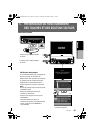
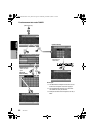
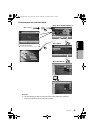
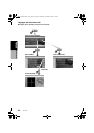
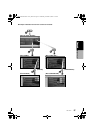
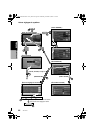
5. OUTLINE OF BUTTON AND
TOUCHKEY OPERATION
Turning the power on
∗1
∗2
System check
The CeNET format utilized on this unit is
provided with a system check function. When
the system check function is performed
under the following conditions, the power is
automatically turned off. Press the [SRC]
button again.
•When power is first turned on after initial
installation.
•When an external device is connected or
disconnected.
•When Reset button is pressed.
∗In addition to the above conditions, the
system check function can be performed
from the GENERAL menu in the ADJUST
mode.
•You can change the media
sources.
Engine ON
position
When the liquid crystal panel is closed
When the liquid crystal panel is open
or
(OPEN)
ori.fm Page 5 Wednesday, November 22, 2006 3:27 PM