


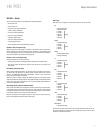

5
HK 990
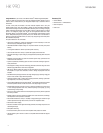
Controls and Functions
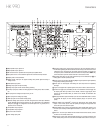
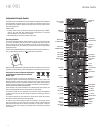
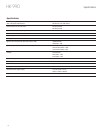
1
Power indicator:
This LED will illuminate in amber when the unit is in the Standby
mode to signal that the unit is ready to be turned on. When the unit is in operation, the
indicator will turn white.
2
System power control:
Press this button to turn on the HK 990; press it again to
turn the unit off (to Standby). Entering Standby also saves all setup parameters.
3
Speaker 1/2 selectors:
Press to select speaker pair 1 or 2, or both, or neither
(headphone output only).
4
Record Out selector
: First press shows the record source presently selected in
the display. Pressing on the Source selector 5 within a few seconds after pressing 4
changes the record source. Exit this function by pressing 6 again, or wait for a few
seconds until exit takes place automatically.
5
Input Source selector
: Select input source for listening by pressing one of the
Source buttons repeatedly to scroll through all the inputs either forwards or backwards,
until the display shows the desired source.
6
Input Setup button
: Press this button to enter/exit the Input Setup mode. Here you
can select the physical connection for each source (Analog/Digital, etc.) as well as Gain,
Bass/Treble, etc. Refer to the Setup section of this manual.
7
Speaker Setup selector:
Press this button to enter the Speaker Setup menu, where
you can switch subwoofers on and off, select crossover frequency, run automatic speaker
setup (EzSet / EQ), etc. Refer to “Setup Instructions” on page 12 in this manual.
8
Up/Down Arrow buttons:
Press to scroll through various options for adjustment
in a menu.
9
Left/Right Arrow buttons:
Press to increase/decrease a parameter or to select
between parameters after selecting a menu for adjustment with the Up/Down Arrow
buttons.
)
Level Settings button:
Press to enter/exit the Balance left/right adjustment for the
speakers as well as subwoofer level.
!
Headphone Jack/Setup Microphone input:
Plug in headphones if desired.
With both Speaker 1 and Speaker 2 selectors in the off position, output is supplied only
to headphones. When using the automatic loudspeaker setup and calibration system
(EzSet / EQ), plug the microphone in here.
@
Volume control:
Turn to raise or lower output volume.
#
Remote Sensor Window:
The sensor behind this window receives infrared signals
from the remote control. Aim the remote at this area and do not block or cover it unless
an external remote sensor is installed.
$
Enter button:
Press to select a parameter for adjustment and to confirm.
%
Main Information Display:
This display delivers messages and status indications
to help you operate the amplifier.
% $# @
!)987654321