Table 4-2 OSD Menu (continued)
Icon Main Menu Submenu Description
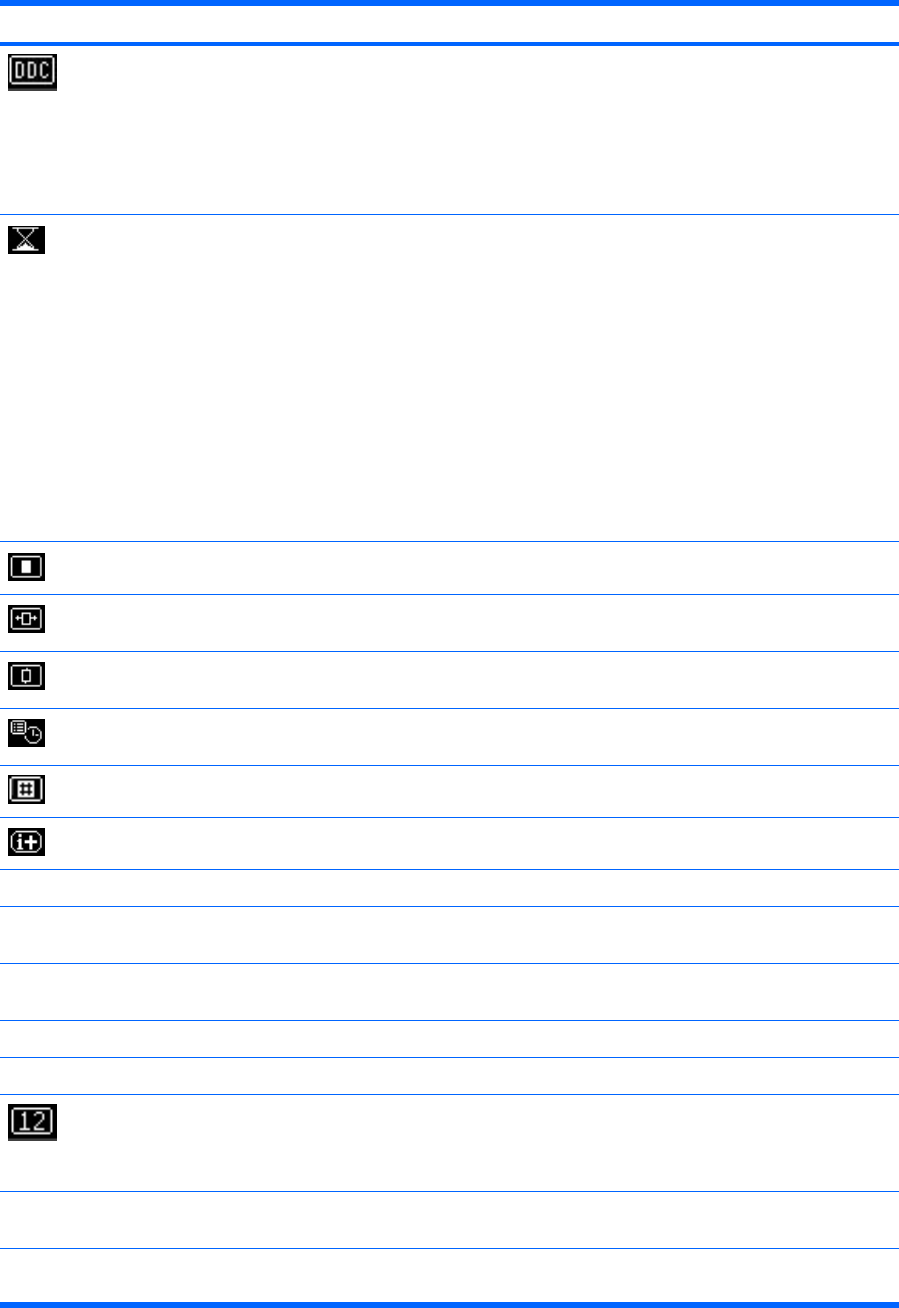
DDC/CI Support Allows the computer to control some OSD menu features such
as brightness, contrast and color temperature. Set to:
●
On
●
Off
The factory default is On.
ENWW
Sleep Timer Provides the timer adjustment menu options:
●
Set Current Time—sets the current time in hours and
minutes
●
Set Sleep Time—sets the time you want to place the
monitor in sleep mode
●
Set on Time—sets the time you want the monitor to wake
up from sleep mode
●
Timer—sets the Sleep Timer feature On or Off. The default
setting is Off
●
Sleep Now—immediately sets the monitor to enter sleep
mode
OSD Control Adjusts the position of the OSD menu on the screen.
Horizontal Position Changes the viewing position of the OSD menu to the left or
right area of the screen. The factory default range is 50.
Vertical Position Changes the viewing position of the OSD menu to the top or
bottom area of the screen. The factory default range is 50.
OSD Timeout Sets the time duration in seconds that the OSD is visible after
the last button is pressed. The factory default is 30 seconds.
OSD Transparency Adjust to view the background
information through the OSD.
Information Selects and displays important information about the monitor.
Current Settings Provides the current input video mode.
Recommended Settings Provides the recommended resolution mode and refresh rate
for the monitor.
Serial Number Reports the serial number of the monitor. The serial number is
needed if contacting HP technical support.
Version Reports the firmware version of the monitor.
Backlight hours Reports the total
hours of backlight operation.
Video Input
Control
Selects the default or primary video input signal when the
monitor is connected to two active and valid video sources. The
monitor will automatically determine the video format. The
default input selection is DVI.
DVI-I#1 Selects DVI-I 1 input. This input accepts either analog or digital
signals.
DVI–I#2 Selects DVI-I 2 input. This input accepts either analog or digital
signals.
26 Chapter 4 Operating the Monitor


