


7
Insignia NS-C4113 Car CD Deck with USB Port
www.insignia-products.com
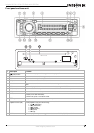
Installing your car CD deck
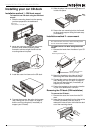
Installation method 1 - DIN front mount
To install the car CD deck using the DIN front
mount:
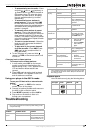
1 Slide the mounting sleeve into the opening
you have prepared in the dashboard.
2 When the mounting sleeve is in the correct
position, bend several mounting
claws
outward to achieve a tight fit and lock the
mounting sleeve into place.
3 Install the outer trim frame on the CD deck.
4 Connect the antenna, the main wire harness
(see “Wiring your car CD deck” on page 8),
and the rear mounting bolt (if necessary to
support your CD deck).
5 Slide the player into the mounting sleeve until
it clicks into place.
6 Secure the rear mounting bolt to the firewall
or other sturdy support using the back strap
(if necessary).
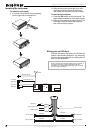
Installation method 2 - screw mount
To install the car CD deck using the screw
holes:
1 Remove the hooks from the sides of your CD
deck.
2 Mount the brackets to the sides of the CD
deck using two screw holes on each side.
3 Connect the antenna, the main wire harness
(see “Wiring your car CD deck” on page 8),
and the rear mounting bolt (if necessary to
support your CD deck).
4 Fasten the brackets to the mounting location
in your car’s dashboard or console.
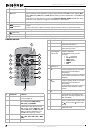
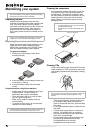
Removing the CD deck (DIN installation)
To remove the CD deck:
1 Remove the outer trim frame from the CD
deck.
2 Insert the keys (supplied) into the sides of the
CD deck (as shown) until they click, to
release the internal locks, then slide the deck
out of the mounting sleeve.
Opening size
7.16 in (182 mm) × 2.1 in (53 mm)
Note
The outer trim frame, the hooks, and the mounting sleeve
are not used for this installation method.
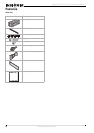
Brackets supplied with your car
Remove the hooks from both
sides of your CD deck