


4
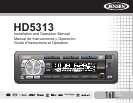
HD5313
Menu Operation
Press and hold the rotary encoder (4) to access the system menu.
Repeatedly press the rotary encoder button to access menu options in the
following order:
• BEEP ON/OFF: The beep tone feature allows the selection of an
audible beep tone to be heard each time a button is pressed on the face
of the radio. “BEEP ON” is the default display. Turn the rotary encoder
to select the “BEEP OFF” option.
• P--VOL: Turn the rotary encoder to select the default volume the radio
will assume when first turned on.
• PCLK ON/OFF: When “ON”, the clock and backlight will remain on
when the unit is turned off.
• HOURS 12/24: This option allows selection of a 12 hour or 24 hour
clock format. “HOURS 12” is the default setting. Turn the rotary encoder
to change to the 24 hour clock format.
• DIMMER: Turn the rotary encoder to change the LCD backlight
brightness from HIGH (default) to MIDDLE to LOW.
• LOCAL/DX (distant): If the stereo signal is intermittent, you can select
“LOCAL” to access only strong local stations. “DX” is the default setting.
Equalizer
Press the EQ button (20) to choose one of the following pre-defined bass
and treble curves: POP > JAZZ > CLAS > BEAT > ROCK > OFF.
Loudness
Press and hold the BAND button (3) toggle loudness on/off. When listening
to music at low volumes, this feature will boost the bass and treble ranges
to compensate for the characteristics of human hearing.
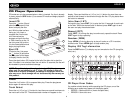
Auxiliary Input
To access an auxiliary device:
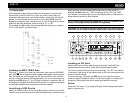
1. Connect the portable audio player to the AUX IN jack on the front panel
(12).
2. Press the SRC button (2) to select AUX mode.
3. Press SRC again to cancel AUX mode and go to the next mode.
Setting the Clock
If not already showing, press the DISP button (7) to display the clock. With
the clock displayed, press and hold the DISP button and the time will flash
on the display. Press the >>| button (10) to adjust the hours or the |<<
button (11) to adjust the minutes. When in “HOURS 12” mode, “AM” or “PM”
will appear on the display to indicate AM or PM. When no adjustment is
made for five seconds, the time will become set and normal operation will
resume.
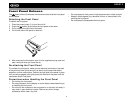
Reset Button
The RESET button is located behind the front panel and should be
activated for the following reasons:
• initial installation of the unit when all wiring is completed
• function buttons do not operate
• error symbol on the display
Use a ball point pen or thin metal object to press the RESET button. This
may be necessary should the unit display an error code.