


5
MCD10
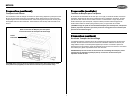
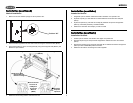
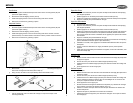
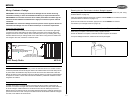
Setting the Anti-vibration Board
The unit can be installed horizontally, vertically, at a 45° angle, or suspended. The position of
the built-in anti-vibration springs (left and right side) must correspond to the mounting position
chosen. If the springs are not set correctly for the type of installation chosen, the anti-vibration
compensation will not be effective, and vibration may cause the disc to skip. Set the anti-
vibration board position with a screwdriver before attaching the brackets.
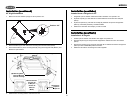
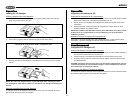
CAUTION! After setting the proper angle before installation, place two pieces of the
larger plastic film (supplied) over the built-in anti-vibration boards to prevent water
entry.
Regulando el Tablero Antivibración
La unidad se puede instalar horizontalmente, verticalmente, en un ángulo de 45° o puede estar
suspendida. La posición de los resortes antivibración incorporados (en los lados derecho e
izquierdo) deben corresponder con la posición de montaje elegida. Si los resortes no están
colocados correctamente de acuerdo al tipo de instalación elegida, la compensación
antivibratoria no tendrá efecto, y la vibración puede causar que el disco salte. Fije la posición
del tablero antivibración con un destornillador antes de sujetar los soportes.
¡CUIDADO! Luego de regular el ángulo apropiado antes de la instalación, coloque dos
pedazos más grandes de plástico (provistos) sobre los tableros antivibración
incorporados para prevenir así la entrada de agua.
Réglez la Planche Anti-Vibration
L'appareil peut être installé horizontalement, verticalement ou à un angle de 45 degrés, ou
bien encore suspendu. La position des ressorts anti-vibration (droite et gauche) doit
correspondre à la position du montage choisi. Si les ressorts ne sont pas montés correctement
pour le type d'installation choisi, la compensation anti-vibration ne sera pas efficace et la
vibration peut produire des sauts dans le changeur de CD. Réglez la position de bord anti-
vibration avec un tournevis avant d'attacher les équerres.
ATTENTION! Après avoir réglé l'angle correct avant l'installation, placez deux bouts
d'un film en plastique plus grand (fourni) sur les planches anti-vibration encastrées
pour empêcher l'entrée de l'eau.
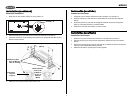
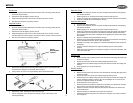
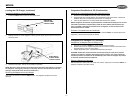
Choosing a Location
Select a location for the CD changer that:
• Provides sufficient ventilation.
• Does not have high temperatures.
• Is not exposed directly to outdoor environment.
• Is not exposed to pressurized water.
• Promotes ease of use. Make certain the changer is easily accessible for loading and
unloading the CD magazine.
• The 15 foot long data cable will reach the radio connection when routed from the changer.
Eligiendo la Ubicación
Selecciones una ubicación para el cambiador de CD que:
• Posea suficiente ventilación.
• No esté a temperaturas extremas.
• No se expone directamente al ambiente al aire libre.
• No se expone al agua presurizada.
• Permita un uso fácil. Asegúrese que el cambiador sea accesible fácilmente para carga y
descarga del compartimento de CDs.
• No esté a una distancia mayor de 15 pies (4,50 metros) del radio. El cable que une el
cambiador con el radio es de 15 pies de largo.
Choisir une Location
Sélectionnez une location pour le changeur qui:
• Fourni une ventilation suffisante.
• N'a pas de températures très hautes.
• N'est pas exposé directement à l'environnement extérieur.
• N'est pas exposé à l'eau pressurisée.
• Facilite l'utilisation. Rassurez-vous que le changeur est facilement accessible pour
charger et décharger le magasin CD.
• N'est pas plus loin que 15 pieds du radio. La câble de données qui relie le changeur au
radio est de 15 pieds de longueur.
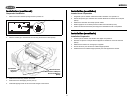
WARNING! Never mount the unit near the fuel tank.
¡CUIDADO! Nunca monte la unidad cerca del tanque de combustible.
AVERTISSEMENT! Ne montez jamais l'appareil près du réservoir de carburant.