


Continued on Next Page
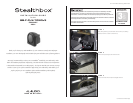
SB-F-FLX-10W3v3 INSTR_SKU# 011293
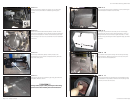
S T E P 7
Using a Die grinder (or a Dremel® type tool), grind off all of
the plastic welds as shown.
***CAUTION***
Always follow proper safety techniques when using
power tools as described by the tool manufacturer.
S T E P 6
The factory subwoofer grille (as shown) needs to be
removed, this process will be completed namely from the
back side of the panel.
S T E P 5
Remove the OEM subwoofer/amplifier as shown. Run the
wire for the Stealthbox® to this general location (indicated by
arrow) as the Stealthbox® will be mounted here, leave extra
wire so that you can secure it as desired once the installation
is finished.
S T E P 4
Remove the interior plastic trim panel, you can leave the
sections of the panel that the seatbelts go through as
shown.
Page 2 • JL Audio, Inc 2009
S T E P 9
Looking at the panel from the front, trim all of the edges
of the opening so that on the sides and bottom, there is a
flange inside the recess where the grille was that is 1” wide
and at the top, the flange should be approximately 3/8” wide
as shown.
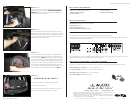
S T E P 1 1
Remove the woofer and, stuffing from the Stealthbox, slide
the Stealthbox® into position, mark the two mounting holes
as shown, remove the enclosure.
S T E P 1 0
Re-install the interior panel along with all of the previously
removed panels. Make sure that you can access the previ-
ously run wire for the Stealthbox®.
S T E P 8
This is the back of the grille completely removed showing all
of the welds that needed to be removed.
3/8”
1”