


SB-F-FLX-10W3v3 INSTR_SKU# 011293
S T E P 1 5
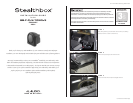
C O N G R A T U L A T I O N S !
You have completed the installation for this model!
Enjoy your new Stealthbox®!
Please refer to the Power Recommendation section for an
amplifier recommendation and basic set-up help.
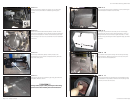
S T E P 1 4
Hook up the wire from the amplifier to the Stealthobx®and,
slide the enclosure into place over the two Allen Head Set
Screws installed in STEP 13. Mount the enclosure using the
included Fender Washers, Split lock Washers and, Hex Nuts
as shown. If neccessary, use a Allen Wrench to keep the Allen
Head Set Screws from rotating while tightening. Remember
to re-install the stuffing that was removed earlier and, rein-
stall the woofer. Test the system for proper operation. Put all
the stuff back in the vehicle that you took out in
STEP 1.
S T E P 1 3
Slide the two Speed Nuts into location with the “Nut” side
towards the outside of the vehicle into position over the two
holes that were just drilled as shown. Install the two 3/8-16
x 2 1/4” Allen Head Set Screw with the Allen Head opening
towards the center of the vehicle.
S T E P 1 2
Using a Unibit® or, a 9/16” drill bit, drill out the two holes
as marked in the previous step. DO NOT DRILL DEEPER
THAN 1/2” or you run the risk of scarring (or penetrating)
the outer sheetmetal of the car.
Page 3 • JL Audio, Inc 2009
All specifications are subject to change without notice. “JL Audio®” and the JL Audio logo, “Stealthbox” and the Stealthbox logo are registered
trademarks of JL Audio, Inc. “Ahead of the Curve” and its respective logo is a trademark of JL Audio, Inc.
JLA-SKU# 011293 05-05-2009 • Printed in USA • ©2008 JL Audio, Inc. • U.S. PATENTS: #5,734,734 #5,949,898 #6,118,884 #6,229,902 #6,243,479
#6,294,959 #6,501,844 #6,496,590 #6,441,685 #5,687,247 #6,219,431 #6,625,292 #D472,891 #D480,709 Other U.S. & Foreign patents pending.
For more detailed information please visit us online at www.jlaudio.com.
(954) 443-1100
www.jlaudio.com
1 0 3 6 9 N O R T H C O M M E R C E P A R K W A Y • M I R A M A R , F L O R I D A • 3 3 0 2 5 • U S A
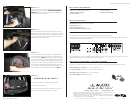
I N C L U D E D H A R D W A R E
2) 3/8-16 x 2 1/4” Allen Head Set Screw 2) 3/8-16 Speed Clip
2) 3/8 x 2” Fender Washer 2) 3/8” Split Lock Washer
2) 3/8-16 Hex Nut
S P E C I F I C A T I O N S
Enclosure Type: Acoustic Suspension (sealed)
Driver Type: 10W3v3-4
Nominal Impedance: 4Ohms
Continuous Power Handling: 500Watts
P O W E R R E C O M M E N D A T I O N
JL Audio recommends using a high quality amplifier such as the JL Audio 250/1v2.
The diagram below shows the recommended crossover, infrasonic filter and equalizer settings for the 250/1v2
when being used to power your Stealthbox
®
.
The JL Audio 250/1v2 is a very versatile audio component. Please consult the owner’s manual for even more
detailed information about installing and tuning this amplifier.
M I D / H I G H F R E Q U E N C Y D R I V E R F I T M E N T
A variety of JL Audio coaxial and component systems will fit in the factory speaker locations of you vehicle.
Front Speaker Size / Location: 5”x 7” / 6”x 8”- Front Doors
Fits JL Audio Models: TR570-CXi, C5-570, C5-570x & ZR570-CSi
Rear Speaker Size / Location: 5”x 7” / 6”x 8”- Rear Door
Fits JL Audio Models: TR570-CXi, C5-570x