


4 | JL Audio - C2-350x Owner’s Manual
Custom Location:Runspeakerwiretothe
desiredmountinglocation.Ifyouarerunning
wiresintoadoor,useexistingfactorywiringboots
wheneverpossible.Ifyouaredrillingnewholes,file
theiredgesandinstallrubbergrommetsintoeach
hole.Then,coverthewireswithaprotectivePVC
sleeveandrunthemthroughthedoorjamb.Make
surethatthewireswillcleardoorhingesandother
structuresinthedoor.Ifyouareunsureaboutany
partofthisprocess,pleasecontactyourJLAUDIO
dealerforinstallationhelp.
WARNING
!!
Double check the clearance for both speakers
before proceeding. Many cars are different from
one side to the other!
Selectanevensurface.Tighteningaspeakeronto
anunevensurfacecandamageit.Usethesupplied
templatetomarkthedesiredmountinglocation.
Markthecenterandtheoutlineofthemounting
holeaswellasthemountingscrewpositions.Before
drillingorcuttingonyourinteriorpanels,usea
utilityknifetocutanyfabric,vinylorleatherfrom
holelocations.Thesematerialscaneasilybesnagged
byadrillorasaw,causingdamagetothepanel
andpossiblebodilyinjury.Drillfour1/8-inch(3
mm)holesforthespeaker’smountingscrewsatthe
positionsyouhavemarked.Alsodrillapilothole
inthecenterofthespeakermountingholeatthis
time.Then,usingasabersaw,makethecircularcut
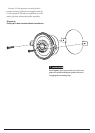
outforthespeaker.Fileanyroughedges.Insertthe
mountingclipswiththeflatsidetowardsthespeaker
asshowninDiagramA(page5).
Itisabsolutelyvitalthatthespeakerframefitsinto
themountingholecleanly.Thismustbecheckedprior
totighteningthescrews.Donotforcetheframeintoa
holethatistoosmall.Donottightenthespeakeronto
anunevensurface.Thiswilldamageyourspeakers.
Thespeakershouldalsofitsothatairdoesnotleak
aroundthemountingflange.Airleakswillcausea
severedegradationinsoundquality.Sealanyairleaks
withanautomotive-gradesealantmaterial.
Connectthespeakerwires,observingcorrect
polarity,andinstallthespeakerasshowninDiagram
A(page5).Hand-tightenthescrewsevenlytoavoid
bendingthespeakerframe!
SPEAKER INSTALLATION
Thespeakershouldbeinstalledinoneofthe
followingwaysdependingonlocation:
Factory Location:Ifyouwillbeusingthefactory
speakerwires,itmaybenecessarytochangethe
terminations.Thismaybeaccomplishedbyusingan
adaptorplugorsimplybycuttingthefactoryconnector
offandusingthesuppliedcrimpconnectorsto
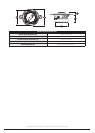
terminatethespeakerwires.Thelargeconnectorisfor
thepositiveterminalandthesmallconnectorisforthe
negativeterminalofeachC2-350x.
Youmayalsochoosetorunnewspeakerwires...
Runspeakerwiretothedesiredmounting
locations.Ifyouarerunningwiresintoadoor,use
existingfactorywiringbootswheneverpossible.If
youaredrillingnewholes,filetheiredgesandinstall
rubbergrommetsintoeachhole.Wiresshouldthen
becoveredwithaprotective,flexiblePVCsleeveand
thenrunthroughthedoorjamb.Makesurethatthe
wireswillcleardoorhingesandotherstructuresin
thedoor.Ifyouareunsureaboutanypartofthis
process,pleasecontactyourJLAudiodealerfor
installationhelp.
WARNING
!!
Double check the clearance for both speakers
before proceeding. Many cars are different from
one side to the other!
Yournewspeakershavebeendesignedtoinstall,
withoutmodifications,intomostvehiclesthataccept
a3.5-inch(90mm)speaker.Mostfactory3.5-inch
speakersusetwomountingscrewswhichwilllineup
withthemountingholesonyourC2-350xspeakers.
Itisabsolutelyvitalthatthespeakerframe
fitsintothemountingholecleanly.Thismustbe
checkedpriortotighteningthescrews.Donot
forcetheframeintoaholethatistoosmall.Do
nottightenthespeakerontoanunevensurface.
Thiswilldamageyourspeakers.Thespeaker
shouldalsofitsothatairdoesnotleakaround
themountingflange.Airleakswillcauseasevere
degradationinsoundquality.Sealanyairleaks
withanautomotive-gradesealantmaterial.
InstallasshowninDiagramA(page5).Usethe
suppliedmountingclipsunlessthefactoryholes
alreadyfeaturethreadedinserts.Hand-tightenthe
screwsevenlytoavoidbendingthespeakerframe!