


6 | JL Audio - C5-525x Owner’s Manual
SPEAKER PLACEMENT CONSIDERATIONS
Inmostcases,yourspeakerswillbeplaced
intofactoryspeakerlocations.Ifyouhavesome
speakermountingflexibility,keepthefollowing
inmind:Lowermountinglocations,suchasthe
lowerfrontcornerofadoororakick-panelprovide
thegreatestpathlengthdistancesforthesound
emittedbythespeakers.Forthisreason,theyare
generallymoredesirablethanhighermounting
locations.Highermountinglocationswillusually
resultinextremenear-sidesoundstagebiaswhich
compromisesthestereolisteningexperience.
WARNING
!!
Double check the clearance for both speakers
before proceeding. Many cars are different from
one side to the other!
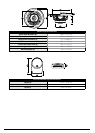
SPEAKER INSTALLATION
Thespeakershouldbeinstalledinoneofthe
followingwaysdependingonlocation:
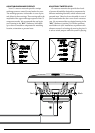
Factory Location:Runspeakerwiretothedesired
mountinglocations.Ifyouarerunningwiresinto
adoor,useexistingfactorywiringbootswhenever
possible.Ifyouaredrillingnewholes,filetheiredges
andinstallrubbergrommetsintoeachhole.Wires
shouldthenbecoveredwithaprotective,flexible
PVCsleeveandthenrunthroughthedoorjamb.
Makesurethatthewireswillcleardoorhingesand
otherstructuresinthedoor.Ifyouareunsureabout
anypartofthisprocess,pleasecontactyour
JLAudiodealerforinstallationhelp.
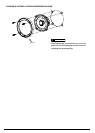
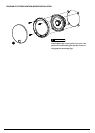
Yournewspeakershavebeendesignedtoinstall,
withoutmodifications,intomostvehiclesthataccept
a5.25-inch(130mm)speaker.Mostfactory5.25
-inchspeakersusefourmountingscrewswhichwill
lineupwiththemountingholesonyourwoofers.
Itisabsolutelyvitalthatthespeakerframe
fitsintothemountingholecleanly.Thismustbe
checkedpriortotighteningthescrews.Donot
forcetheframeintoaholethatistoosmall.Do
nottightenthespeakerontoanunevensurface.
Thiswilldamageyourspeakers.Thespeaker
shouldalsofitsothatairdoesnotleakaround
themountingflange.Airleakswillcauseasevere
degradationinsoundquality.Sealanyairleaks
withanautomotive-gradesealantmaterial.
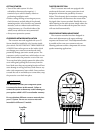
Connectthespeakerwirestobothsetsof
terminalsoneachspeaker,observingcorrect
polarityandmakingsurethatthetweeterand
wooferwirescorrespondtothecorrectterminals
onboththespeakerandthecrossover.
Securethespeakerandgrilletray(ifdesired)
tothepanelbyevenlytighteningbyhand
mountingscrews.Usethesuppliedmounting
clipsandthetheprovided#8x1.25inch(32
mm)mountingscrewsunlessthefactory
holesalreadyfeaturethreadedinserts.