


8 | JL Audio - C5-525x Owner’s Manual
Securethespeakerandgrilletraytothe
panelbyevenlytighteningbyhandtheprovided
#8x1.25inch(32mm)mountingscrews.
Breakoffsmallpiecesofthesuppliedbutyladhesive
puttyandplacethemontheinsideofeachgrille
tray.Thisadhesivewillholdthegrillemeshinsert
inplacefirmlyandpreventrattling.Insertthegrille
meshinsertintothegrilletray,squeezinggently
arounditsedgeuntilitseatsfirmlyintothetray.
Finally,attachtheself-adhesiveJLAudiologo
badgetothegrillemeshinsert.
Custom Location:Runspeakerwiretothedesired
mountinglocations.Ifyouarerunningwiresinto
adoor,useexistingfactorywiringbootswhenever
possible.Ifyouaredrillingnewholes,filetheir
edgesandinstallrubbergrommetsintoeachhole.
Wiresshouldthenbecoveredwithaprotective,
flexiblePVCsleeveandthenrunthroughthedoor
jamb.Makesurethatthewireswillcleardoor
hingesandotherstructuresinthedoor.Ifyou
areunsureaboutanypartofthisprocess,please
contactyourJLAudiodealerforinstallationhelp.
Double check the clearance for both
speakers before proceeding.
Selectanevensurface.Tighteningaspeakeronto
anunevensurfacecandamageit.Usethesupplied
templatetomarkthedesiredmountinglocation.
Markthecenterandtheoutlineofthemounting
holeaswellasthemountingscrewpositions.
Beforedrillingorcuttingonyourinteriorpanels,
useautilityknifetocutanyfabric,vinylorleather
fromholelocations.Thesematerialscaneasily
besnaggedbyadrillorasaw,causingdamageto
thepanelandpossiblebodilyinjury.Drillfour
1/8-inch(3mm)holesforthespeaker’smounting
screwsatthepositionsyouhavemarked.Alsodrill
apilotholeinthecenterofthespeakermounting
holeatthistime.Then,usingasabersaw,make
thecircularcutoutforthespeaker.Fileanyrough
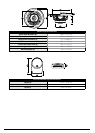
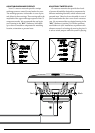
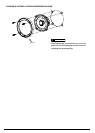
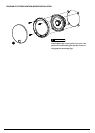
edges.Insertthemountingclipswiththeflatside
towardsthespeakerasshownintheDiagramE.
Itisabsolutelyvitalthatthespeakerframe
fitsintothemountingholecleanly.Thismustbe
checkedpriortotighteningthescrews.Donot
tightenthespeakerontoanunevensurface!This
willdamageyourspeakers.Thespeakershould
alsofitsothatnoairleaksaroundthemounting
flange.Airleakswillcauseaseveredegradation
insoundquality.Sealanyairleakswithsilicone,
ropecaulkorsimilarsealantmaterial.
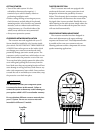
Connectthespeakerwirestobothsetsof
terminalsoneachspeaker,observingcorrect
polarityandmakingsurethatthetweeterand
wooferwirescorrespondtothecorrectterminals
onboththespeakerandthecrossover.