


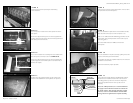

STEP 9
Place the Stealthbox® upside down on the folded rear seats.
Back out both socket cup set screws to expose 1-1/5".
With an 1/2" drill bit and drill. Drill through the floor at the
wax squares, using the impressions of the socket cup set
screw as a guide.
Once both holes have been drilled, remove both
wax sqaures.
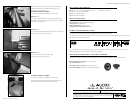
STEALTHBOX WALL
THREADED INSERT
VEHICLE SHEET METAL
FENDER WASHER
SOCKET CUP SET SCREW
LOCK WASHER
FLAT WASHER
HEX NUT
SILCONE SEALANT
STEP 11
From under the vehicle, place the supplied fender washers,
flat washers, lock washers and then hex nuts onto each
protruding socket cup set screw and secure. Adjust the
amount of exposed thread on each cup set screw if
necessary.
Note: For added protection, it is recommended that
you apply a bead of silicone between the vehicle and
the fender washer. After the bolt assembly is tightly
secured, it is also recommended that vehicle under-
coating material is applied to the exposed assembly.
STEP 10
Place the Stealthbox® into place. Carefully guiding the socket
cup set screws through the drilled holes.
Run speaker wire from the amplifier location to the enclosure
and attach to the terminal.
Check the woofers for proper operation.
Continued on Next Page
SB-D-MGACAB/10W6v2_INSTR_SKU# 011217
SB-D-MGACAB/10W6v2_INSTR_SKU# 011217
STEP 7
Thread in the two supplied socket cup set screws to the
bottom of the Stealthbox®. Leaving about 1/4" exposed.
STEP 6
The 31-3/4" measurement is starting from the middle of the
first wax square to the left, as seen in STEP5&6.
Remove the paper backing from the second supplied wax
square. Apply this second wax square 31-3/4" to the left of
the first wax square.
STEP 5
As in the picture, measure for the exact placement of the
wax square.
Remove the paper backing from one of the supplied wax
squares. Apply the wax square onto the flooring behind the
rear seating on the driver's side.
STEP 4
Remove the driver’s and passenger’s side folding
floor extensions.
STEP 8
Position the enclosure and press firmly down. This is to leave
an impression onto the wax squares.
Page 2 • JL Audio, Inc 2006
4-inches
9-1/4-inches
9-1/4-inches
31-3/4-inches
31-3/4-inches