


Continued on Next Page
SB-F-ESCP/10W1V2 INSTR_SKU# 011286
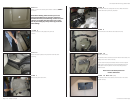
S T E P 6
Remove bottom plastic trim piece from rear left door
opening.
S T E P 4
Drill a 1” hole in the interior panel where marked as STEP 3
as shown.
Note: Before drilling, make sure that you are not
going to be drilling into any gas lines, brake lines,
transmission lines, electrical wiring, transfer case (4x4
vehicles) or anything else that might cause a reduc-
tion in your weekly pay. Always wear eye protection
when drilling!
Page 2 • JL Audio, Inc 2008
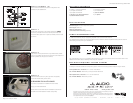
S T E P 9
This shows the holes where the bracket mounts.
S T E P 1 0 D E T A I L 1
The bracket will be mounted as shown at left in the older
model vehicles.
S T E P 1 0
Mount the bracket.
The bracket will be oriented as shown with all three bolts in a
straight line in the newer vehicles.
For the older models, the bracket will be mounted upside
down to the photo at left with the stud threaded into the
“triangular” hole and, above the two mounting bolts as
shown below
Please refer to the detail pictures for
further clarification.
S T E P 8
The interior with the side panel removed. Note where the
bracket had been previously installed
S T E P 5
Remove bottom trunk plastic trim panel as
shown.
S T E P 7
Remove side panel as shown.