


SB-F-ESCP/10W1V2 INSTR_SKU# 011286
Page 5• JL Audio, Inc 2008
All specifications are subject to change without notice. “JL Audio®” and the JL Audio logo, “Stealthbox” and the Stealthbox logo are registered
trademarks of JL Audio, Inc. “Ahead of the Curve” and its respective logo is a trademark of JL Audio, Inc.
JLA-SKU# 011286 01-22-2009 • Printed in USA • ©2008 JL Audio, Inc. • U.S. PATENTS: #5,734,734 #5,949,898 #6,118,884 #6,229,902 #6,243,479
#6,294,959 #6,501,844 #6,496,590 #6,441,685 #5,687,247 #6,219,431 #6,625,292 #D472,891 #D480,709 Other U.S. & Foreign patents pending.
For more detailed information please visit us online at www.jlaudio.com.
(954) 443-1100
www.jlaudio.com
1 0 3 6 9 N O R T H C O M M E R C E P A R K W A Y • M I R A M A R , F L O R I D A • 3 3 0 2 5 • U S A
I N C L U D E D H A R D W A R E
2) 1/4-20 x 1 1/4” Hex Head Bolt 2) 1/4-20 Hex Hed Nut
2) 1/4” Split Lock Washer 2) 1/4” Flat Washer
1) 3/8” Split Lock Washer 1) 3/8” Flat Washer
1) 3/8-16 x 2 1/4” Allen Head Stud 1) 1” Spacer
1) Custom Mount bracket
S P E C I F I C A T I O N S
Enclosure Type: Acoustic Suspension (sealed)
Driver Type: 10w1v2-4
Nominal Impedance: 4 ohms
Continuous Power Handling: 300watts
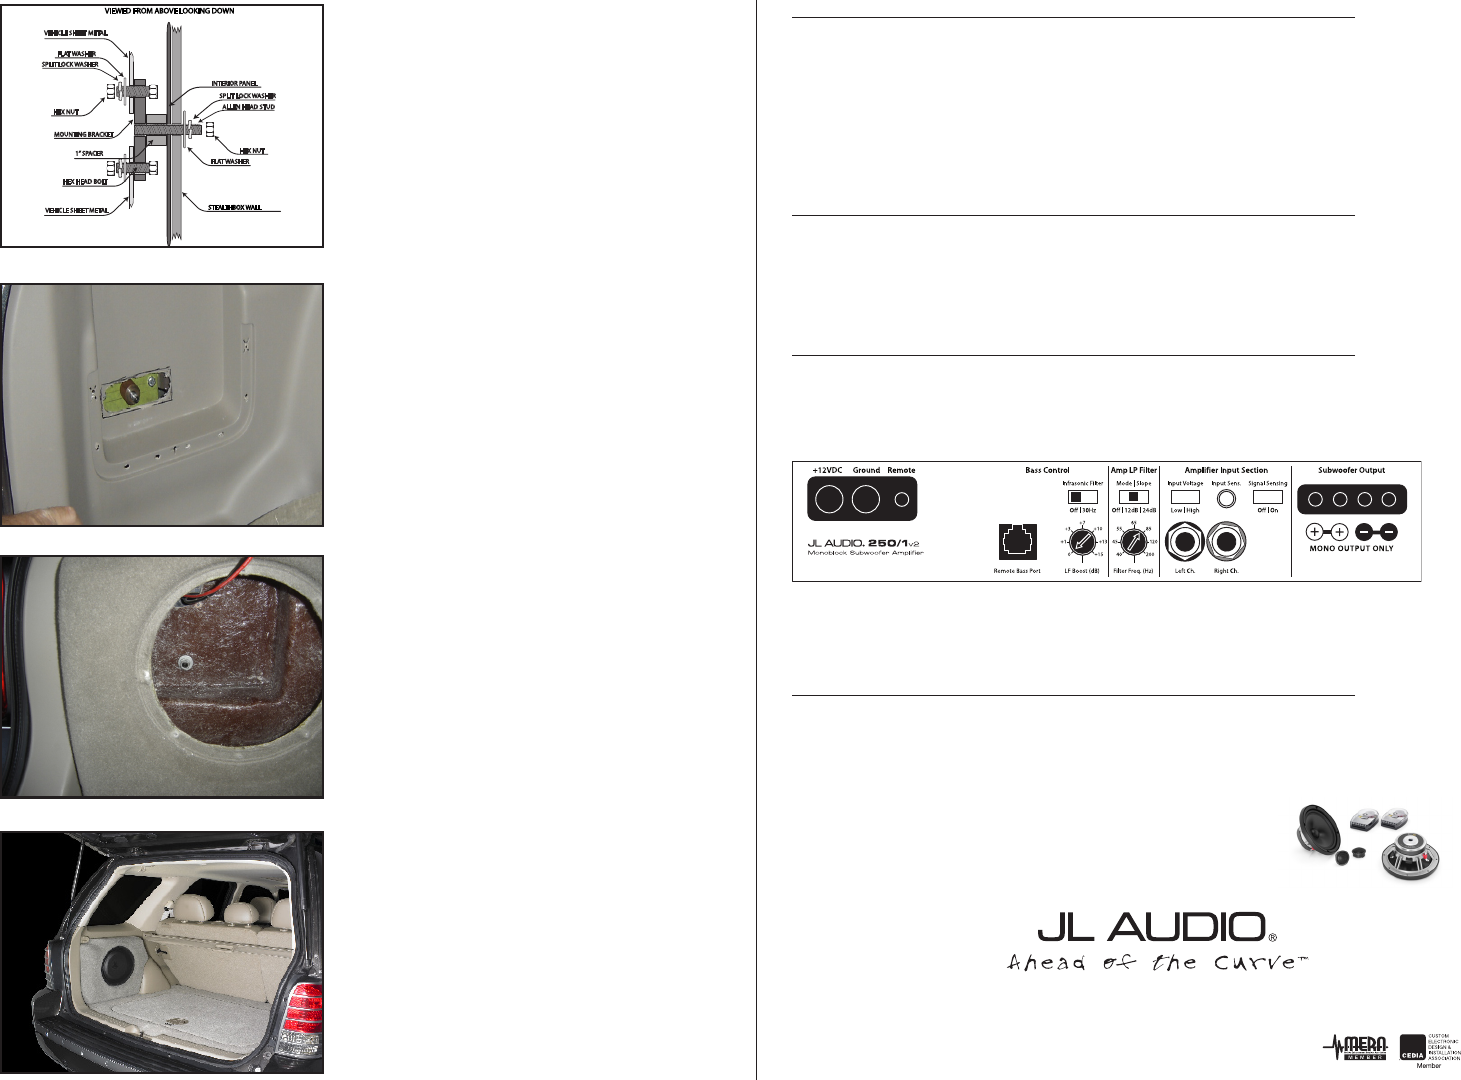
P O W E R R E C O M M E N D A T I O N
JL Audio recommends using a high quality amplifier such as the JL Audio 250/1v2.
The diagram below shows the recommended crossover, infrasonic filter and equalizer settings for the 250/1v2
when being used to power your Stealthbox
®
.
The JL Audio 250/1v2 is a very versatile audio component. Please consult the owner’s manual for even more
detailed information about installing and tuning this amplifier.
M I D / H I G H F R E Q U E N C Y D R I V E R F I T M E N T
A variety of JL Audio coaxial and component systems will fit in the factory speaker locations of you vehicle.
Front Speaker Size / Location: 5”x 7” / 6”x 8”- Front Doors
Fits JL Audio Models: TR570-CXi, C5-570, C5-570x & ZR570-CSi
Rear Speaker Size / Location: 5”x 7” / 6”x 8”- Rear Door
Fits JL Audio Models: TR570-CXi, C5-570x
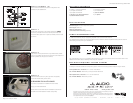
S T E P 1 1
Expand the round hole in the interior panel from STEP 4
as shown, re-install all of the the interior panels that were
removed earlier, place the 1” Spacer (included) over the Stud
as shown.
S T E P 1 3
Mount woofer to the box . place grill over the speaker,
secure the woofer and you are done.
C O N G R A T U L A T I O N S !
You have completed the installation for this model!
Enjoy your new Stealthbox®!
Please refer to the Power Recommendation section for an
amplifier recommendation and basic set-up help.
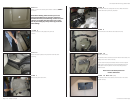
S T E P 1 0 D E T A I L 2
This is how the hardware should be configured for the
bracket and, the Stealthbox®.
S T E P 1 2
Put the box in the panel and line it up with the bolt. Make
sure to run speaker wire from the enclosure to the location of
the amp before securing it to the vehicle.
1” SPACER
INTERIOR PANEL
SPLIT LOCK WASHER
FLAT WASHER
STEALTHBOX WALL
HEX NUT
VEHICLE SHEET METAL
ALLEN HEAD STUD
HEX NUT
MOUNTING BRACKET
HEX HEAD BOLT
FLAT WASHER
SPLIT LOCK WASHER
VIEWED FROM ABOVE LOOKING DOWN
VEHICLE SHEET METAL
1” SPACER
INTERIOR PANEL
SPLIT LOCK WASHER
FLAT WASHER
STEALTHBOX WALL
HEX NUT
VEHICLE SHEET METAL
ALLEN HEAD STUD
HEX NUT
MOUNTING BRACKET
HEX HEAD BOLT
FLAT WASHER
SPLIT LOCK WASHER
VIEWED FROM ABOVE LOOKING DOWN
VEHICLE SHEET METAL
1” SPACER
INTERIOR PANEL
SPLIT LOCK WASHER
FLAT WASHER
STEALTHBOX WALL
HEX NUT
VEHICLE SHEET METAL
ALLEN HEAD STUD
HEX NUT
MOUNTING BRACKET
HEX HEAD BOLT
FLAT WASHER
SPLIT LOCK WASHER
VIEWED FROM ABOVE LOOKING DOWN
VEHICLE SHEET METAL