


➔➔
➔➔
➔
➔
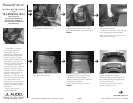
STEP 7:
Position the Stealthbox into location.
Hand tighten front of Stealthbo;, using the
supplied pair of1” sapcers, pair of lock washers,
pair of fender washers and the pair of
#8x40mm bolts.
STEP 8: (no picture)
Line up rear of
Stealthbox to the rear angle bracket that was
mounted in STEP 5. Mount the Stealthbox
using the bolts that held the rear angle bracket
onto the enclosure, that was removed in
STEP 5.
With all bolts lined up, securly thighten all
mounting bolts.
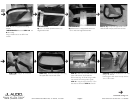
STEP 13: With internal console and structure
support removed from outside shell.
Cut the four
tabs that are shown.
Cont.
From
Page 1
Continued on Page 3 ➔
➔
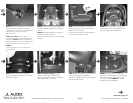
STEP 9:
With factory console outside truck,
remove the four 8mm bolts from bottom of
console.
STEP 10:
Remove hinghed lid by removing
the seven T-15 torx head bolts.
(6 are shown in the picture, 7th is under strap,
not seen)
STEP 14:
With Steathbox mounted, place the
OEM console shell over Stealthbox.
Push in the supplied pair of tree locks to each
side of the OEM console.
STEP 15: Using a 1/8” drill bit, drill into
upper sides of the Stealthbox. Using the OEM
screw holes as guides. Use the four screws
that was removed in STEP12 to mount
outside shell to the Stealthbox.
STEP 11:
With lid removed, this will allow
access to a pair of T-15 Torx bolts. Remove
these T-15 Torx head bolts.
Pull out inner console from outside shell.This
will expose the structure support.
STEP 12: Remove the four screws from
sides of the structure support. Remove the
structure support from outside shell.
SB-F-RTEKCTR/12W3v2-D2, JL AUDIO, Inc 2002
Sheet SKU#011159 Revision 11/18/2003Page 2
www.jlaudio.com
➔➔
STEP 13 B (if nessesary): In some
consoles there might be additional two
tabs.They are located on the rear of outside
shell, remove these is so equipt.
➔
➔
➔
➔
➔
➔
➔
➔
➔
➔
➔
➔
➔
➔
➔
➔
➔
➔
➔
➔
➔