


➔➔
➔➔ ➔
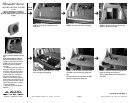
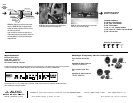
STEP 18: Place the supplied slotted mounting bar
into mounting area.The bar will go behind the open-
ing.
The slot needs to be facing up.
STEP 22: Place the supplied socket cup set screw
into the Stealtbox.
Leaving about 1-1/2” exposed.
Cont.
From
Previous
Page
Continued on Next Page ➔
➔
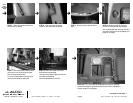
VEHICLE'S SHEET METAL
TAP BOLT
FLAT WASHER
HEX NUT
FLAT WASHER
LOCK WASHER
STEP 19: With the slotted mounting bar into posi-
tion. Place a supplied 1/4”lock washer, 1/4” flat wash-
er onto each supplied bolt.
Slide each assembly through the drilled hole and
through the slotted mounting bar.
Place another flat washer and a hex nut onto each
bolt. (As in picture above)
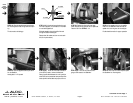
STEP 23(A): Under the driver’s side rear section
of the SUV.You need to remove the black vent.
Place a large flat blade between the vent lip and the
metal.There are two areas that have push clips. Push
these clips with the flat blade and pop out the vent.
➔
STEP 23(B): With the vent removed, this is
going to allow access to the Stealthbox.
STEP 24: With help from a second person, place
the Stealthbox into mounting area.
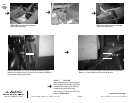
STEP 21: Run speaker wire from the amplifier
location to the Stealthbox. Make sure that the
speaker wire is running over the mounting bar.
Double check the woofer for proper operation.
SB-N-ARMDA/10W6v2, JL AUDIO, Inc 2005
Sheet SKU#011193 Revision 5/26/2005Page 4
www.jlaudio.com
STEP 20: Replace the driver’s side rear cargo
panel, rear belts, driver’s side rear door sill plate back
inside the SUV from STEPs 5 - 11.