


Continued on Next Page
SB-N-FRNTCC/10W1v2_INSTR_SKU#011229
SB-N-FRNTCC/10W1v2_INSTR_SKU#011229
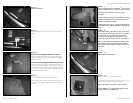
STEP 7
Place the Stealthbox® into the mounting location.
Use a supplied 3/8-inch bolt to secure the long end of the
Z-bracket to the top of the Stealthbox®. Only hand tighten at
this time.
STEP 6
Trucks that are equipped with the factory woofer.
Use the supplied 6mm bolt to secure the short end of the
supplied Z-bracket to the floor, as in the picture. Only hand
tighten at this time.
Trucks that are not equipped with the factory woofer.
Feel for a mounting point that is located under the carpet
and on the floor area that slopes up. Once found, cut the car-
pet around this mounting point. Use the supplied 6mm bolt
to secure the short end of the supplied Z-bracket to the floor.
Only hand tighten at this time.
STEP 5
Place the middle of the wax square into place, shown in the
picture.
STEP 4
Remove the sill plate.
Page 2 • JL Audio, Inc 2006
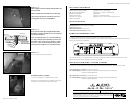
STEP 10
Note: Before drilling, make sure that you are not going
to be drilling into any gas lines, brake lines, transmission
lines, electrical wiring, transfer case (4x4 vehicles)
or anything else that might cause a reduction in your
weekly pay. Always wear eye protection when drilling!
With a 1/2-inch drill bit and drill, place the drill bit through
wax square and the carpeting at the impression made in
the wax square. Drill through the metal floor. Remove the
wax square.
STEP 12
Place the Stealthbox® into the mounting area.
Run speaker wire to the Stealthbox® and wire to the terminal.
Double check the woofer for proper operation.
Back out the socket cup set screw to expose 2-inches
Place the Stealthbox
®
into position by guiding the socket
cup set screw through the drilled hole.
STEP 11
Place the sill plate back into place.
STEP 8
Lower the seat down onto the Stealthbox
®
. Line up the top
corner of the Stealthbox
®
to the bottom corner of the seat.
Flip the seat up and push down onto the top of the
Stealthbox
®.
Unbolt the Z-bracket and remove the Stealthbox
®
carefully,
leaving the wax square in place. The socket cup set screw
will leave an impression in the wax.
Using an utility knife, cut an “X” through the wax square at
the impression of the socket cup set screw and through the
carpet.
6-inches
5-inches