


4
Caution:
• Some of the applications in the connected iPod/
iPhone may not work correctly with this unit.
• Avoid using the iPod/iPhone if it might hinder your
safety while driving.
• Make sure all important data has been backed up to
avoid losing the data.
Selecting the playback modes
The following is not applicable in <IPOD MODE> and
<EXT MODE>.
1
2
]
“REPEAT”
j
“RANDOM”
3
REPEAT
ONE RPT : Functions the same as
“Repeat One” of the iPod
ALL RPT : Functions the same as
“Repeat All” of the iPod
RANDOM
SONG RND : Functions the same as
“Shuffle Songs” of the iPod
ALBUM RND
: Functions the same as
“Shuffle Albums” of the iPod
• To cancel repeat play or random play, select
“RPT OFF” or “RND OFF.”
• “ALBUM RND” is not available for some iPod/iPhone.
• To return to the previous menu, press
BACK
.
Changing the display information
Album name/performer
=
Track title
=
Current
track number with the elapsed playing time
=
Current track number with the clock time
=
(back to the beginning)
In <EXT MODE>: EXT MODE
j
EXT MODE with
clock time
Stopping playback
and detaching the
iPod/iPhone
Straightly pull the USB 2.0 cable out from the unit.
“NO USB” appears. Press
/ SOURCE
to listen to
another playback source.
• For details, refer also to the instructions supplied
with your iPod/iPhone.
The following is not applicable in <EXT MODE>.
Starts playback or pauses/
resumes playback
• While in <EXT MODE>,
the sound mutes.
Selects track or chapter
Fast-forwards or reverses
the track
Selecting a track from the menu
The following is not applicable in <IPOD MODE> and
<EXT MODE>.
1
2
]
Select the desired menu.
PLAYLISTS
j
ARTISTS
j
ALBUMS
j
SONGS
j
PODCASTS
j
GENRES
j
COMPOSERS
j
AUDIOBOOKS
j
(back
to the beginning)
3
]
Select the desired track.
Repeat this procedure until the desired track
is selected.
• If the selected menu contains many tracks, you can
fast search (±10, ±100, ±1000) through the menu
by turning the control dial quickly.
• To search through the menu, see the following.
• To return to the previous menu, press
BACK
.
While listening, you can adjust the tone level of the
selected sound mode.
1
2
Adjust the level (–06 to +06) of the selected
tone (BASS / MID / TRE).
The sound mode is automatically stored and
changed to “USER.”
Tone
Sound element
Frequency Level Q
BASS 60 Hz, 80 Hz,
100 Hz, 200 Hz
–06 to
+06
Q1.0, Q1.25,
Q1.5, Q2.0
MIDDLE 0.5 kHz, 1.0 kHz,
1.5 kHz, 2.5 kHz
–06 to
+06
Q0.75, Q1.0,
Q1.25
TREBLE 10.0 kHz, 12.5 kHz,
15.0 kHz, 17.5 kHz
–06 to
+06
Q FIX
Menu operations
1 2 3
Repeat step 2 if necessary.
• To return to the previous menu, press
BACK
.
• To exit from the menu, press
DISP
or
MENU
.
Category Menu item Selectable setting, [
Initial: Underlined
]
DEMO • DEMO ON
• DEMO OFF
: Display demonstration will be activated automatically if
no operation is done for about 20 seconds.
: Cancels.
CLOCK
CLOCK SET [ 1:00 ] : Adjust the hour, then the minute.
Selecting a preset sound mode
You can select a preset sound mode suitable for the music genre.
FLAT
=
NATURAL
=
DYNAMIC
=
VOCAL BOOST
=
BASS BOOST
=
USER
=
(back to
the beginning)
Searching through list menu/phone book
Storing your own sound mode
You can store your own adjustments in memory.
1
2
]
<PRO EQ>
]
<BASS> / <MIDDLE> /
<TREBLE>
3
Adjust the sound elements of the selected
tone ( see table on the left).
4
Repeat steps 2 and 3 to adjust other tones.
The adjustments made will be stored
automatically in “USER.”
The current sound mode changes to “USER”
automatically.
[Hold]
[Hold]
[Hold]
[Hold]
[Hold]
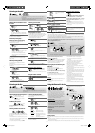
Listening to the external components
You can connect an external component to the AUX
(auxiliary) input jack on the control panel.
Preparation:
Make sure <AUX ON> is selected for the
<SRC SELECT>
=
<AUX IN> setting on page 5.
1
]
“AUX IN”
2
Turn on the connected component and start
playing the source.
You can use the search menu (A to Z, 0 to 9, and
OTHERS) to scroll through the list menu/phone book.
• “OTHERS” appears (except when the source is
IPOD-FRONT/IPOD-REAR) if the 1st character is not
A to Z or 0 to 9, such as #, —, !, and etc.
Applicable only when:
Source/Menu Condition
CD MP3/WMA disc
USB FRONT/
USB REAR
MP3/WMA/WAV folder/track
Call Menu Bluetooth mobile phone:
“Call Menu”
]
PHONEBOOK (see
“Making a call” on page 3)
IPOD-FRONT/
IPOD-REAR
<HEAD MODE> is selected
1
]
Enter list menu.
• To show the phonebook search menu, skip
this step.
2
]
Show the search menu.
The first character of the current folder/file
name or the first name in your phonebook
appears.
3.5 mm (3/16”) stereo mini
plug (not supplied)
Portable audio player,
etc.
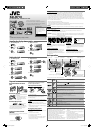
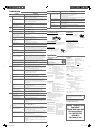
Listening to the iPod/iPhone
You can connect the iPod/iPhone using the USB 2.0 cable (accessory of the iPod/iPhone) to the USB input
terminal on the control panel or USB cable from the rear of the unit.
There are three control terminals:
<HEAD MODE> Control by this unit;
<IPOD MODE> Control by the connected iPod/iPhone;
<EXT MODE> The sound of any functions (musics, games, applications, etc.) running on the connected
iPod/iPhone is emitted through the speakers connected to this unit.
Preparation:
Select the controlling terminal, <HEAD MODE>, <IPOD MODE>, or <EXT MODE> for iPod playback:
• Press and hold
BACK
button.
• Make the selection from <IPOD SWITCH> setting, see page 5.
The operations explained below are under <HEAD MODE>.
~
]
Turn on the power.
Ÿ
Playback starts automatically.
and/or
USB input terminal
iPod/iPhone
iPod/iPhone
USB 2.0 cable (accessory
of the iPod/iPhone)
USB 2.0 cable (accessory
of the iPod/iPhone)
USB cable from the
rear of the unit
Using the remote controller
The following is not applicable in <EXT MODE>.
2
R
/
F
3
: Selects track or chapter
2
R
/
F
3
[Hold]
: Fast-forwards or reverses the
track
Notice:
When operating an iPod, some operations may not
be performed correctly or as intended. In this case,
visit the following JVC web site: <http://www.jvc.
co.jp/english/car/> (English website only).
Setting item Selectable setting, [
Initial: Underlined
]
INFORMATION • MY BT NAME
• MY ADDRESS
• BT SW VER
• PH CNNT DEV *
2
• AU CNNT DEV *
2
: Shows the unit name.
: Shows address of USB Bluetooth Adapter.
: Shows the software version.
: Shows connected phone name.
: Shows connected audio device name.
*
2
Displayed only when a Bluetooth phone/audio player is connected.
Warning messages
ERROR CNNCT The device is registered but the connection has failed. Use <CONNECT PH/CONNECT AU>
to connect the device again.
ERROR Try the operation again. If <ERROR> appears again, check if the device supports the
function you have tried.
PLEASE WAIT The unit is preparing to use the Bluetooth function. If the message does not disappear,
turn off and turn on the unit, then connect the device again (or reset the unit).
HW ERROR Reset the unit and try the operation again. If “HW ERROR” appears again, consult your
nearest JVC car audio dealers.
Bluetooth Information:
If you wish to receive more information about Bluetooth, visit the following JVC web site:
<http://www.jvc.co.jp/english/car/> (English website only).
3
]
Select your desired character.
The track list or name list of the selected
character appears.
4
]
Select your desired item.
• To return to the previous menu, press
BACK
.
• Only the existing characters will be shown on the
search menu.
• Press and hold
5
/
∞
to continuously change the
character of the search menu.
• If your device contains many tracks, searching take
some time.
• When the source is “IPOD-FRONT/IPOD-REAR,”
searching may not work on some of the layers of
the selected menu.
EN_KD-R710[J]f.indd 4EN_KD-R710[J]f.indd 4 12/23/09 3:23:08 PM12/23/09 3:23:08 PM