


– 3 –
Before mounting the monitor to the ceiling:
• Perform the required external connections first (see reverse
page).
• Wear goggles or protective eyewear to protect your eyes
especially while drilling the holes.
• Pay attention not to damage the car interior and its fittings and
the ceiling of your car.
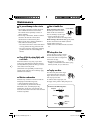
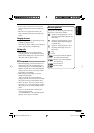
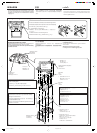
1 Remove the dome light and interior headliner from
the ceiling.
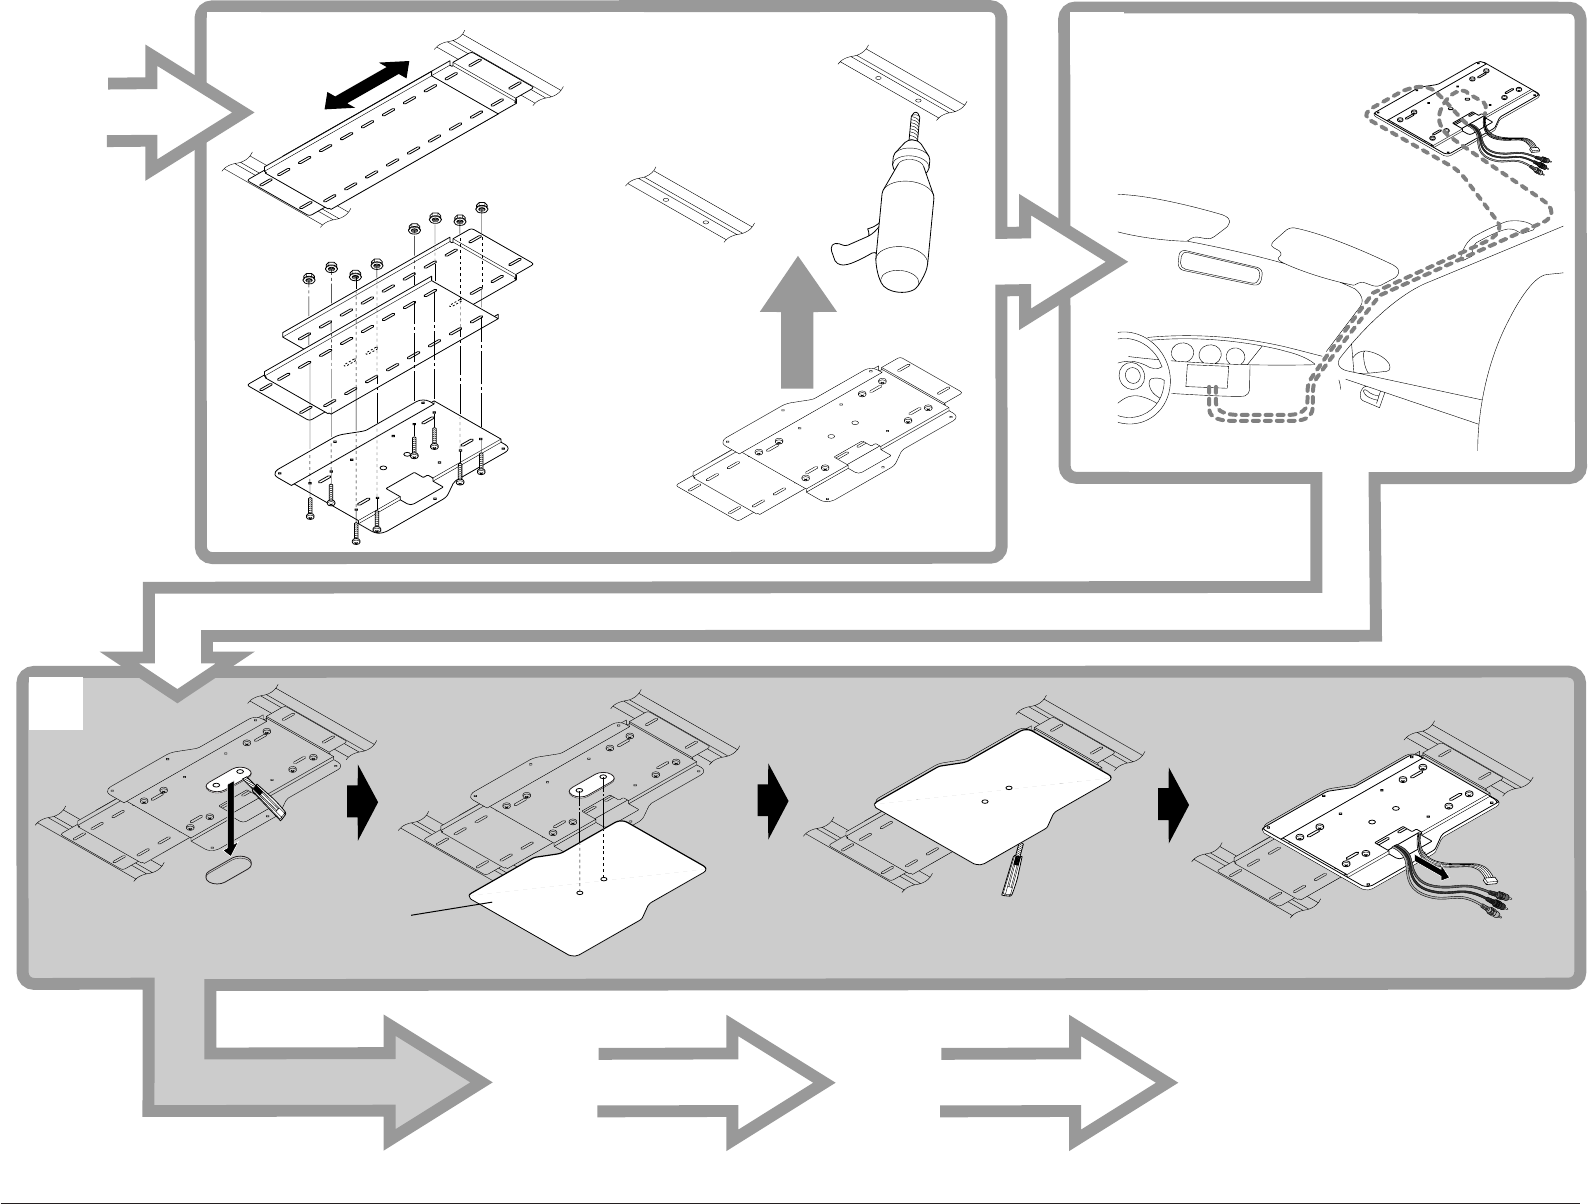
2 Assemble the slide plates and the base plate.
• Determine the monitor installation position and length of
combined slide panels first.
3 Attach the assembled plates to the ceiling
reinforcement crosspieces.
• Drill the four holes in the ceiling reinforcement crosspieces
to meet the mounting holes of the assembled plates.
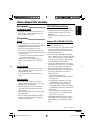
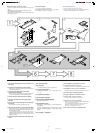
4 Finish wiring then attach the interior headliner.
5 Cut off the headliner using the supplied paper
template.
6 Connect the harness and plugs from the ceiling to
the monitor.
• For wiring and connections, see the reverse side.
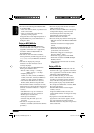
7 Attach the shroud and the monitor to the base plate.
• When using the shroud, the supplied spacers should be
inserted to be kept the appropriate distance between the
base plate and the shroud.
If the supplied spacers and screws cannot keep the
appropriate distance between the headliner and the monitor,
modify the spacers and screws (or obtain those of the
appropriate length).
8 After mounting the monitor, attach the dome light
covers.
首先執行必要的外部連接:
• 首先執行必要的外部連接(請參閱背頁)。
• 戴護目鏡或者保護眼罩可保護您的眼睛,尤其是在鑽孔時。
• 注意不要損壞汽車內部零件,裝置及車頂。
°ËÕ𵑥µ—È߮տ“懢ȓ°—∫‡æ¥“π√∂:
• „ÀÈ∑”°“√‡™◊ËÕ¡µËÕ¿“¬πÕ°∑’Ë®”‡ªÁπ°ËÕπ (æ≈‘°ÀπÈ“À≈—ß)
• «¡·«Ë𵓠À√◊Õ‡§√◊ËÕߪÈÕß°—𵓠‡æ◊ËÕª°ªÈÕߥ«ßµ“¢Õߧÿ≥ ‚¥¬‡©æ“–¢≥–‡®“–√Ÿ
• √–«—ßլ˓„ÀÈ«—¥ÿ √«¡∂÷ßÕÿª°√≥Ï∑’˵‘¥µ—Èß¿“¬„π ·≈–À≈—ߧ“√∂‡’¬À“¬
1 摘除頂燈及車頂內飾板。
2 安裝滑板及底板。
• 首先應確定監視器的安裝位置及組合滑板的長度。
3 將安裝板附在頂棚加固橫杆上。
• 在頂棚加固橫杆上鑽四個孔,孔的大小應與安裝板的安裝孔
大小一致。
4 完成連線後將車頂內飾板裝上。
5 用提供的紙模板切內飾板連線。
6 將導線及插座穿過車頂棚連接到監視器。
• 連線及連接詳情請參閱反面。
7 將遮蓋和監視器附在底板上。
• 當使用遮蓋時,為保持底板與遮蓋之間的最佳距離請插入附
送的間隔墊圈。
如果附送的間隔墊圈和螺絲不能在紙模板和監視器之間保持
最佳距離,請更換間隔墊圈和螺絲(或找到合適長度的墊圈
和螺絲)。
8 固定好監視器後,將頂燈罩裝上。
1 ∂Õ¥Ω“§√Õ∫‰ø√Ÿª‚¥¡ ·≈–«—¥ÿ∫ÿ¥È“π„πÕÕ°®“°‡æ¥“π√∂
2 ª√–°Õ∫™‘ÈπË«π¢Õß·ºËπ‡≈◊ËÕπ ·≈–·ºËπ√Õß∞“π
• °ËÕπÕ◊Ëπ®–µÈÕß°”Àπ¥µ”·ÀπËß „π°“√µ‘¥µ—È߮տ“æ ·≈–§«“¡¬“«¢Õß·ºß‡≈◊ËÕπ
3 µ‘¥·ºËπ∑’Ë„™È„π°“√ª√–°Õ∫®Õ¿“æ °—∫·°π‡√‘¡∑’ˇ楓π√∂
• ‡®“–√Ÿ’Ë√Ÿ∑’Ë·°π‡√‘¡‡æ¥“π „ÀÈæÕ¥’°—∫√Ÿ∑’Ë®–„™È„π°“√µ‘¥µ—Èß·ºËπª√–°Õ∫®Õ¿“æ
4 À≈—ß®“°‡¥‘𓬉ø·≈È« ®÷ßµ‘¥«—¥ÿ∫ÿ¥È“π„π°≈—∫‡¢È“∑’Ë
5 µ—¥«—¥ÿ∫ÿÕÕ° ‚¥¬„™È·ºËπ°√–¥“…·∫∫∑’Ë„ÀÈ¡“æ√ÈÕ¡‡§√◊ËÕß
6 µËÕ“¬√—¥ ·≈–ª≈—Í° ®“°‡æ¥“π√∂ ¡“¬—߮տ“æ
• „π°“√‡¥‘𓬉ø ·≈–°“√‡™◊ËÕ¡µËÕ“¬µË“ßÊ „ÀÈ¥ŸÀπÈ“À≈—ß
7 µ‘¥·ºËπ√Õ߮տ“æ ·≈–®Õ¿“æ °—∫·ºËπ√Õß∞“π
• ‡¡◊ËÕ„™È·ºËπ√Õß §«√„Ë·À«π√Õß∑’Ë„ÀÈ¡“æ√ÈÕ¡‡§√◊ËÕߥȫ¬ ‡æ◊ËÕ„Àȉ¥È√–¬–∑’ˇÀ¡“–
¡ √–À«Ë“ß·ºËπ√Õß∞“π°—∫·ºËπ√Õ߮տ“æ
À“°·À«π√Õß·≈–°√Ÿ∑’Ë„ÀÈ¡“æ√ÈÕ¡‡§√◊ËÕ߉¡Ë“¡“√∂√—°…“√–¬–∑’ˇÀ¡“–¡«—
¥ÿ∫ÿ„µÈÀ≈—ߧ“ °—∫®Õ¿“æ‰¥È ¢Õ„ÀÈ¥—¥·ª≈ß·À«π√Õß·≈–°√Ÿ
(À√◊ÕÀ“·À«π√Õß·≈–°√Ÿ∑’Ë¡’¢π“¥‡À¡“–¡¡“„™È)
8 À≈—ß®“°µ‘¥µ—È߮տ“æ·≈È« „Àȵ‘¥Ω“§√Õ∫‰ø√Ÿª‚¥¡°≈—∫‡¢È“∑’Ë
7
1
3 42
5
678
Paper template
紙模板
·ºËπ°√–¥“…·∫∫
Install1-3-KV-MRD900 22/3/05, 10:01 PM3