


4
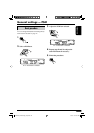
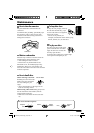
Connecting the monitor / °“√µËÕ®Õ¿“æ
D
E
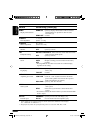
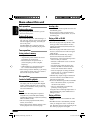
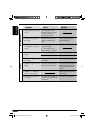
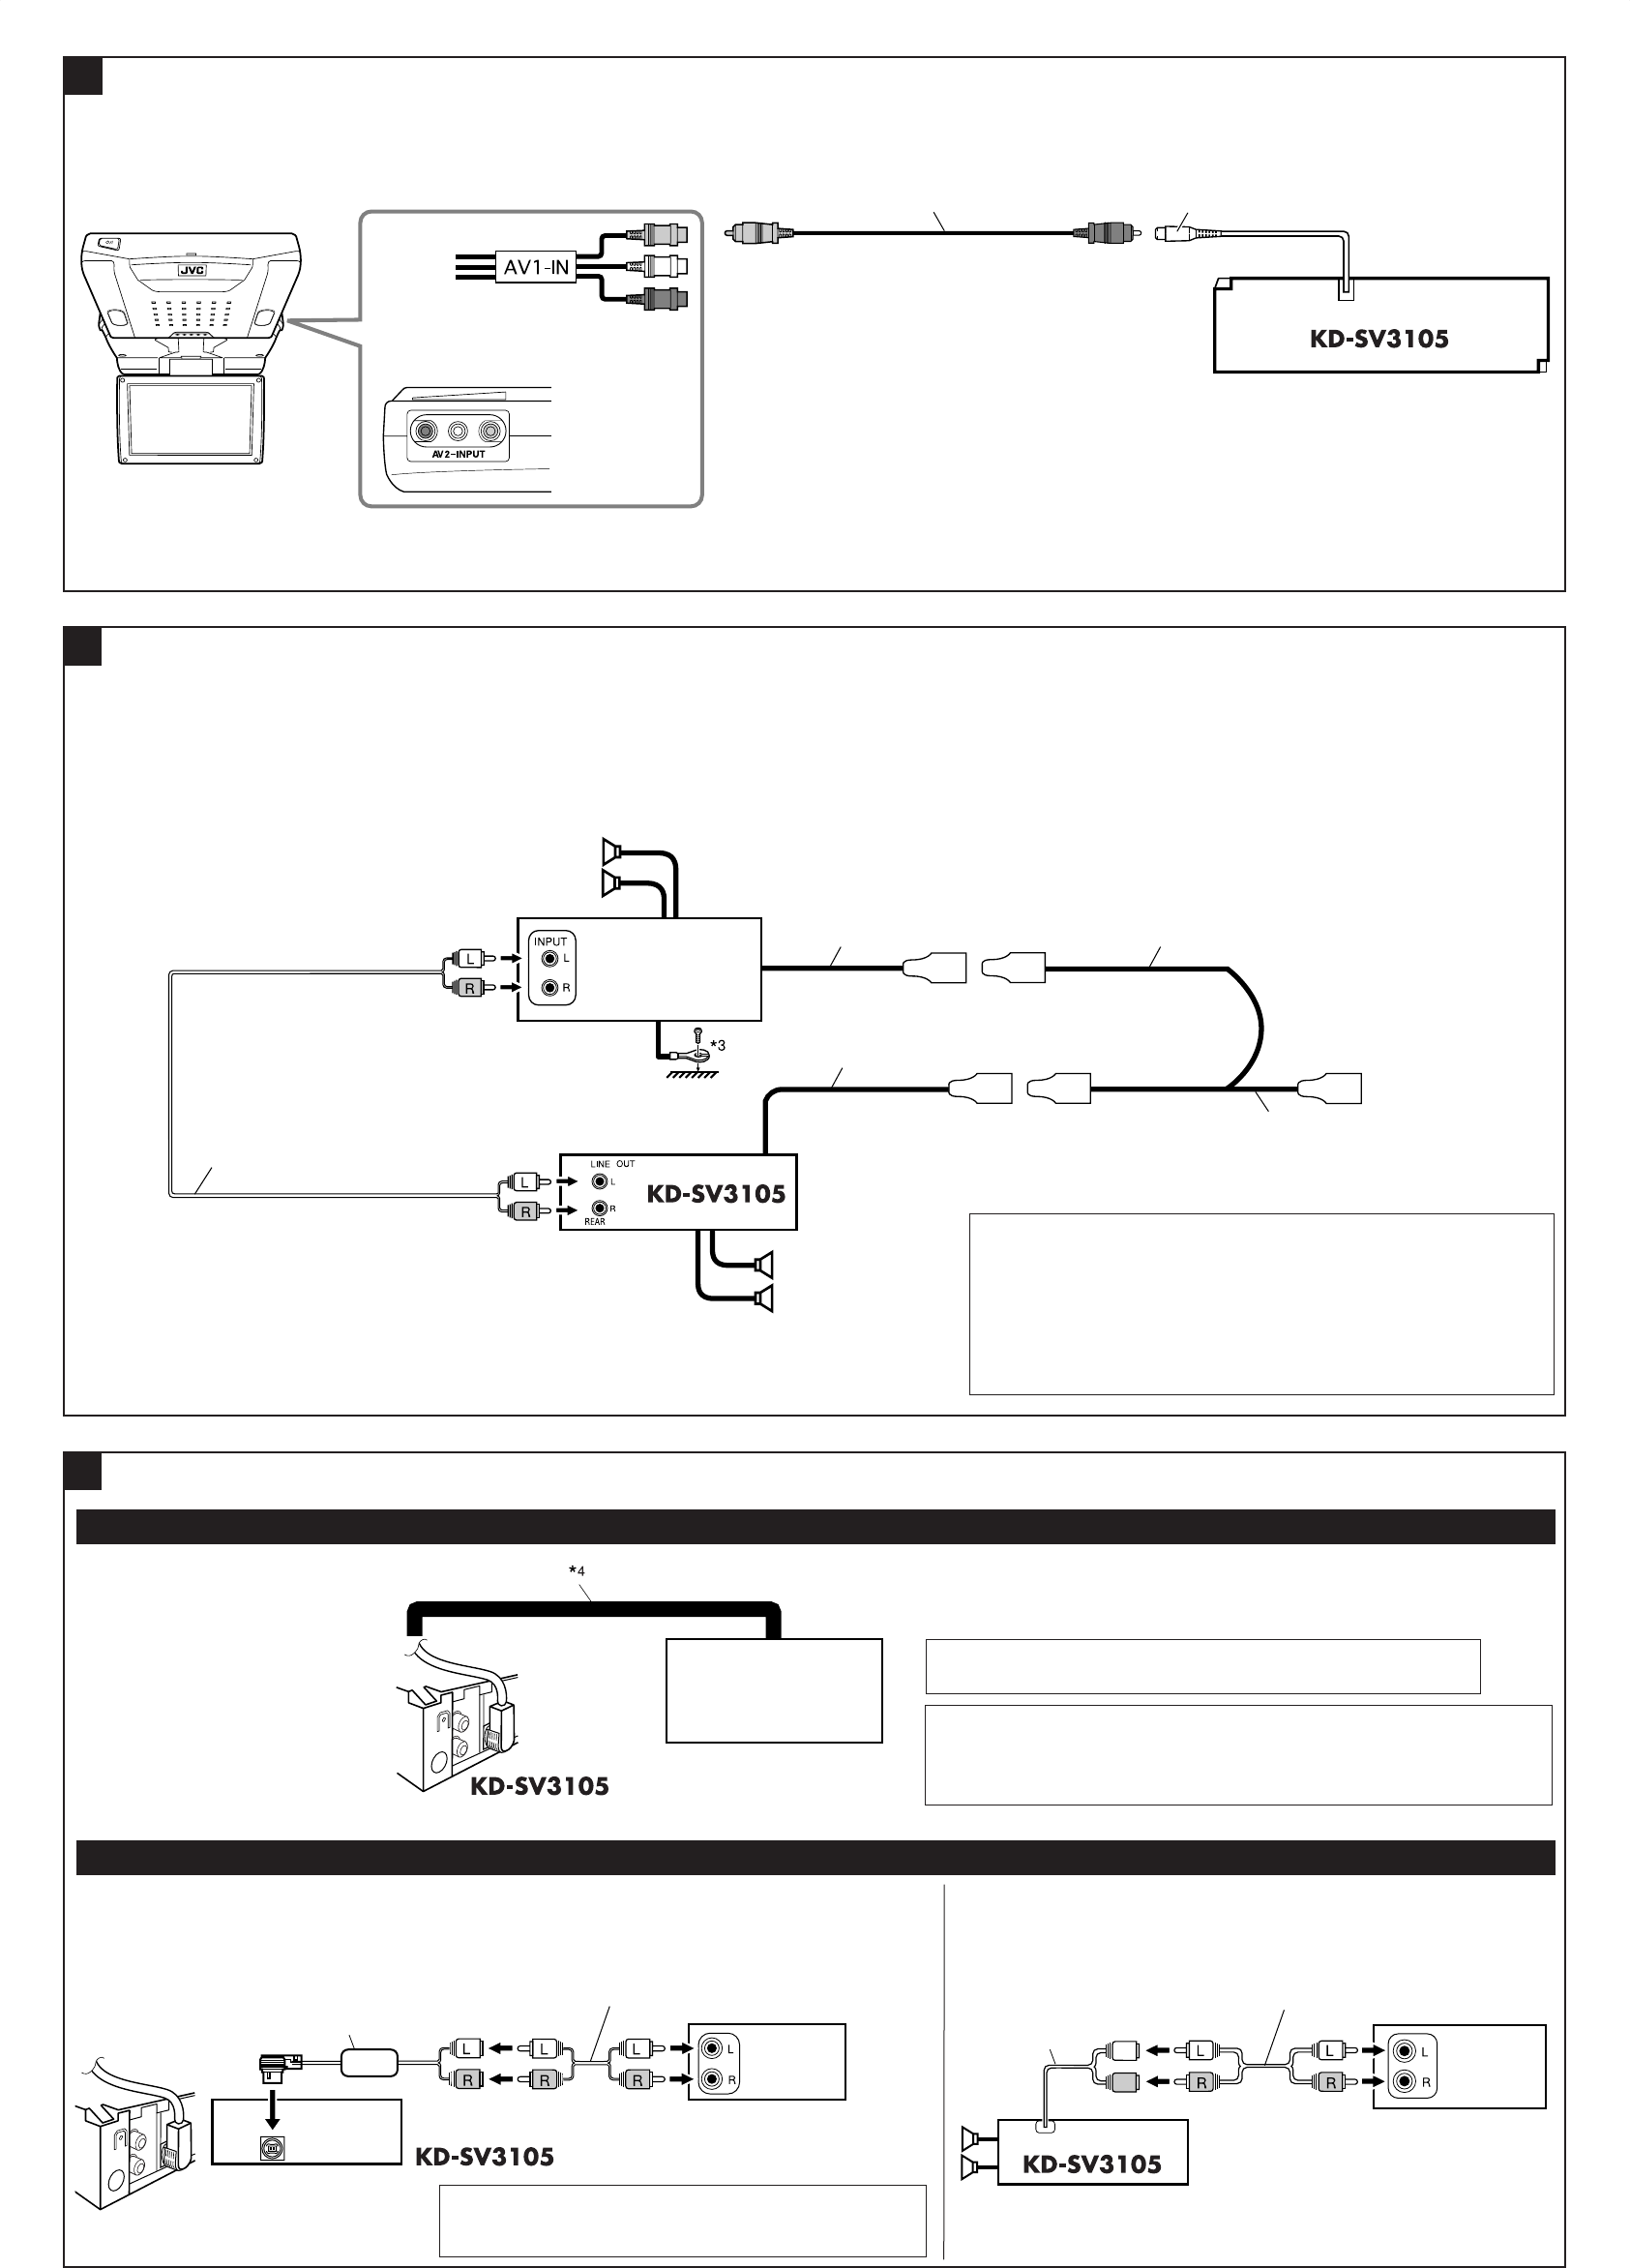
Connecting the external amplifier / °“√µËÕ‡æ‘Ë¡‡µ‘¡‡¢È“°—∫Õÿª°√≥ÏÕ◊Ëπ
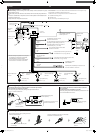
You can connect amplifier to upgrade your car stereo system.
• Connect the remote lead (blue with white stripe) to the remote lead of the other equipment
so that it can be controlled through this unit.
• Disconnect the speakers from this unit, connect them to the amplifier. Leave the
speaker leads of this unit unused.
To the remote lead of other equipment or auto antenna if any
µËÕ“¬°—∫Õÿª°√≥ÏÕ◊ËπÀ√◊Õ‡“Õ“°“»Õ—µ‚π¡—µ‘∂È“¡’
Y-connector (not supplied for this unit)
¢ÈÕµËÕ√Ÿªµ—« Y (‰¡Ë‰¥È„ÀÈ¡“°—∫™ÿ¥ª√–°Õ∫π’È)
Remote lead
“¬µ–°—Ë«•–¬–‰°•
Signal cord (not supplied for this unit)
“¬‡§‡∫‘≈—≠≠“≥ (‰¡Ë‰¥È„ÀÈ¡“°—∫™ÿ¥ª√–°Õ∫π’È)
Rear speakers
≈”‚æßÀ≈—ß
JVC Amplifier
‡§√◊ËÕߢ¬“¬‡’¬ß JVC
Front speakers
≈”‚æßÀπÈ“
Remote lead (blue with white stripe)
“¬µ–°—Ë«•–¬–‰°• (’πÈ”‡ß‘π≈“¬¢“«)
*
3
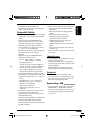
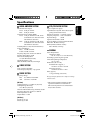
Firmly attach the ground wire to the metallic body or to the chassis
of the car—to the place not coated with paint (if coated with paint,
remove the paint before attaching the wire). Failure to do so may
cause damage to the unit.
*
3
µËÕ≈«¥
“¬¥‘π„ÀÈ·πËπ‡¢È“°—∫µ—«∂—߇À≈Á° À√◊Õµ—«∂—ß√∂
—
µ√ß
Ë«π ∑’ˉ¡Ë¡’
’‡§≈◊Õ∫
(À“°¡’
’‡§≈◊Õ∫Õ¬ŸË „ÀÈ¢Ÿ¥
’ÕÕ°°ËÕπ °ËÕπµËÕ≈«¥
“¬¥‘π) À“°‰¡ËªØ‘∫—µ‘µ“¡§”·π–π”π’È ‡§√◊ËÕßÕ“®
™”√ÿ¥À√◊Õ‡
’¬À“¬‰¥
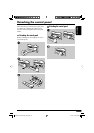
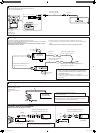
JVC CD changer / ‡§√◊ËÕ߇≈Ëπ´’¥’ CD JVC
*
4
Connecting cord supplied for your CD changer
*
4
“¬µËÕ„ÀÈ¡“æ√ÈÕ¡‡§√◊ËÕ߇≈Ëπ´’¥
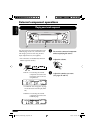
F
Connecting the external components / °“√µËÕ‡æ‘Ë¡‡µ‘¡‡¢È“°—∫Õÿª°√≥ÏÕ◊Ëπ Ê
• Refer also to page 15 of the
INSTRUCTIONS.
• ¥Ÿ√“¬≈–‡Õ’¬¥„πÀπÈ“ 15 ¢ÕߢÈÕ·π–
π”¥È«¬
JVC CD changer
‡§√◊ËÕ߇≈Ëπ´’¥’ CD JVC
External component / Õÿª°√≥Ï¿“¬πÕ°
KS-U57*
5
CD changer jack
™ËÕ߇’¬∫µËÕ¢Õ߇§√◊ËÕ߇≈Ëπ´’¥ CD
LINE IN
Set external input to “EXT IN” (see page 24 of the INSTRUCTIONS).
µ—Èß—≠≠“≥‡¢È“®“°¿“¬πÕ°‡ªÁπ
“EXT IN”
(¥ŸÀπÈ“
24
§”·π–π”
)
*
5
Line Input Adapter KS-U57 (not supplied for this unit)
*
5
Õ·¥ª‡µÕ√Ï “¬—≠≠“≥‡¢È“ KS-U57 (‰¡Ë‰¥È„ÀÈ¡“°—∫™ÿ¥ª√–°Õ∫π’È)
External component
Õÿª°√≥Ï¿“¬πÕ°
External component
Õÿª°√≥Ï¿“¬πÕ°
AV1-IN
AV2-INPUT
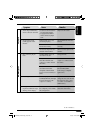
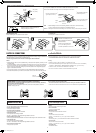
Before connecting the monitor, make sure the unit is turned off.
°ËÕπ®–µËÕ®Õ¿“æ ¢Õ„ÀÈ·πË„®«Ë“‰¥Èª‘¥‡§√◊ËÕß·≈È«
Video cord (not supplied)
“¬«‘¥’‚Õ (‰¡Ë‰¥È„ÀÈ¡“æ√ÈÕ¡‡§√◊ËÕß)
VIDEO OUT
Or / À√◊Õ
Rear side
¥â“πÀ≈—ß
KV-MR9010
9-INCH WIDESCREEN MONITOR
(not supplied)
¡Õ𑇵Õ√Ï’®Õ°«È“ß 9 π‘È«
(‰¡Ë‰¥È„ÀÈ¡“æ√ÈÕ¡‡§√◊ËÕß)
§ÿ≥“¡“√∂µËÕ°—∫·Õ¡æ≈‘ø“¬‡ÕÕ√Ï ·–Õÿª°√≥ÏÕ◊òπʉ¥ô ‡æ◊ËÕ‡æ‘Ë¡§ÿ≥ ¿“懒¬ß„ÀÈ°—∫√–∫∫‡µÕ√‘‚Õ¢Õß√∂¬πµÏ
• µËÕ“¬µ–°—Ë«√–¬–‰°≈ (’πÈ”‡ß‘π≈“¬¢“«) ‡¢È“°—∫“¬µ–°—Ë«√–¬–‰°≈¢ÕßÕÿª°√≥ÏÕ◊Ëπ Ê ‡æ◊ËÕ®–“¡“√∂§«∫§ÿ¡‚¥¬™ÿ¥ª√–
°Õ∫π’ȉ¥È
• ∂Õ¥≈”‚æßÕÕ°®“°™ÿ¥ª√–°Õ∫π’È ·≈È«µËÕ‡¢È“°—∫‡§√◊ËÕߢ¬“¬ ∑‘Èß“¬µ–°—Ë«≈”‚æߢÕß™ÿ¥ª√–°Õ∫π’ȉ«
Signal cord (not supplied for this unit)
“¬‡§‡∫‘≈—≠≠“≥ (‰¡Ë‰¥È„ÀÈ¡“°—∫™ÿ¥ª√–°Õ∫π’È)
Signal cord (not supplied for this unit)
“¬‡§‡∫‘≈—≠≠“≥ (‰¡Ë‰¥È„ÀÈ¡“°—∫™ÿ¥ª√–°Õ∫π’È)
CAUTION / ¢ÈÕ§«√√–«—ß:
• Before connecting the CD changer, make sure that the unit is turned off.
• °ËÕπ®–‡™◊ËÕ¡µËÕ CD ‡™π‡®Õ√Ï °√ÿ≥“µ√«®Õ∫„ÀÈ·πË„®«Ë“ª‘¥‡§√◊ËÕßÕ¬ŸË
Instal3-4_SV3105_004A.indd 4 3/17/05 11:52:04 AM