


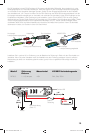

5
OPERATION
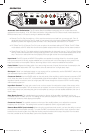
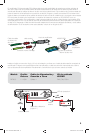
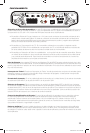
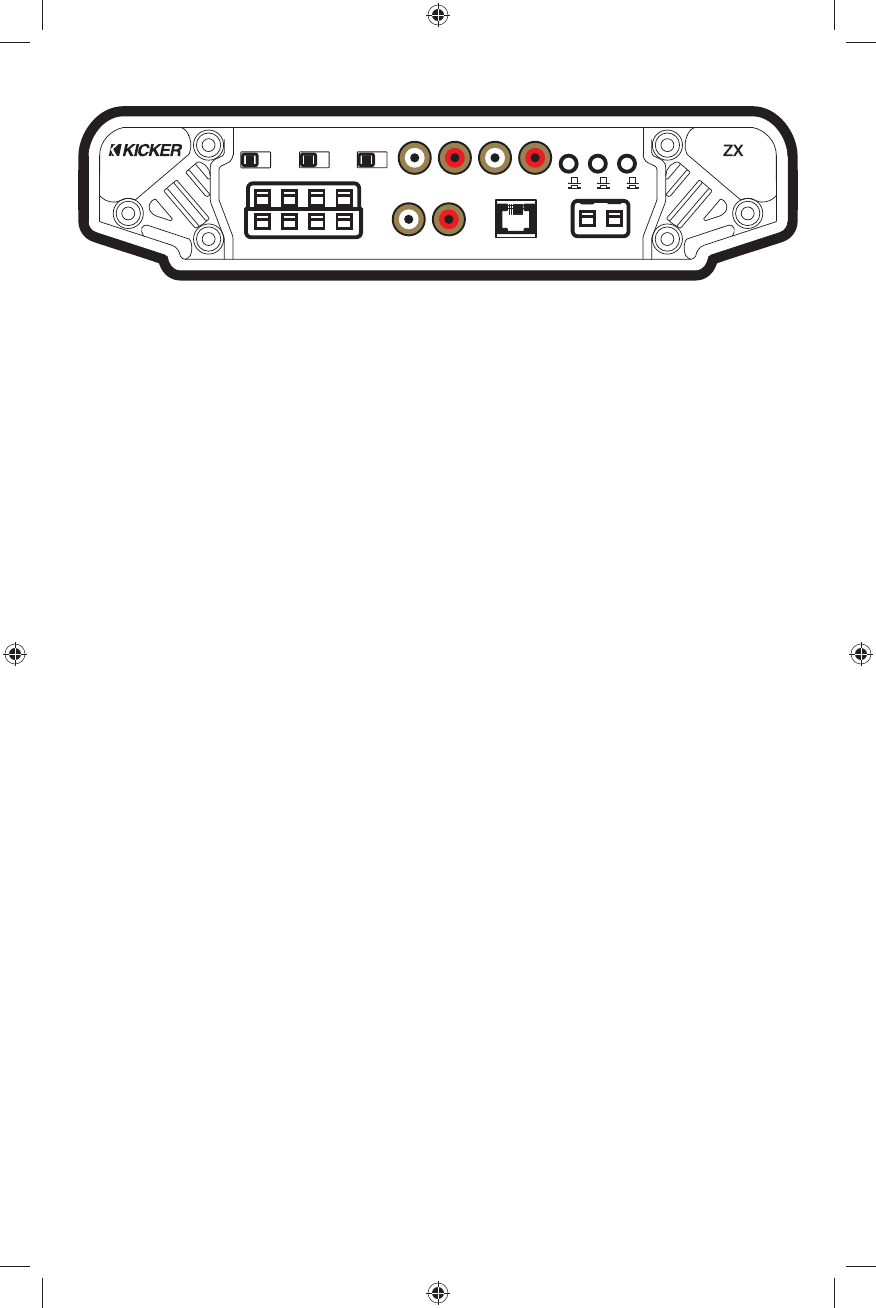
AUTO
TURN ON
+12V DC AUDIO
XOVER2
OFF HI
XOVER1
OFF HI
LO
HI
REMOTE
BASS
AMP1 INPUT
1
2
L+ L- R+ R-
+ SUB -
AMP2 INPUT
INPUT
LEVEL
OFF
ON
FADER
AMP2
SUB
SUB
INPUT
LLR
SUB INPUT
LR
R
Automatic Turn-On Selection: The ZX series offers three different automatic turn-on modes that can be
selected on the end panel; +12V, DC Offset, and Audio. Using either the DC Offset or Audio mode causes the
REM terminal to have +12V out for turning on additional amplifi ers.
• Remote Turn-On: Set the switch to +12V to use the remote turn-on lead from your source unit. Run 18
gauge wire from the Remote Turn-On Lead on your source unit to the terminal labeled REM between the
amplifi er’s positive and negative power terminals. This is the preferred automatic turn-on method.
• DC Offset Turn-On: If Remote Turn-On is not an option, the next best setting is DC Offset. The DC Offset
mode detects a 6V DC offset from the HI-Level speaker outputs when the source unit has been turned on.
• Signal Sense Turn-On: The Audio setting is the fi nal alternative for Automatic turn-on. This is a Signal Sense
turn-on method that detects the incoming audio signal from your source unit and automatically turns on the
amp. This turn-on method will not work properly if the input gain control is not set appropriately.
Input Level: The RCA inputs on KICKER ZX amplifi ers are capable of receiving either Hi or Low-level signals
from your source unit. If the only output available from your source unit is a Hi-Level signal, simply press in the
Input Level switch on the amplifi er. Refer to the wiring section of this manual for additional instructions.
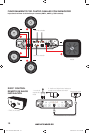
Fader Switch: Depress the fader switch if you are running two sets of inputs (front and rear for example) to the
amplifi er. Leave the fader switch OFF if you want to drive all channels from a single stereo input.
Sub Input: If there is no dedicated output on your source unit for a subwoofer, use the SUB INPUT switch to set
your subwoofer input to either SUB INPUT or AMP INPUT 2.
Crossover Switch: Use the XOVER switch on the end panel of the amplifi er to set the internal crossover to OFF
or HI. When the switch is set to OFF, a full bandwidth signal will be amplifi ed. Set the switch to HI if you want the
amplifi er’s internal crossover to serve as a high-pass fi lter. Never change the crossover “OFF/HI” switch setting
with the audio system on!
Input Gain Control: The input gain control is not a volume control. It matches the output of the source unit to
the input level of the amplifi er. Turn the source unit up to about 3/4 volume (if the source unit goes to 30, turn it
to 25). Next, slowly turn (clockwise) the gain on the amplifi er up until you can hear audible distortion, then turn it
down a little.
Bass Boost Control: The variable bass boost control on the top of the amplifi er is designed to give you
increased output, 0–18dB, at 40 Hz. The setting for this control is subjective. If you turn it up, you must readjust
the input gain control to avoid clipping the amplifi er.
Crossover Control: The variable crossover on the top of the amplifi er allows you to adjust the crossover
frequency from 50–200Hz. The setting for this control is subjective; 80Hz is a good place to start.
Remote Bass-ZXRC (not included): When using the remote bass level control, you have the ability to control
the output level of the amplifi er remotely. To mount the ZXRC remote bass level control, simply screw the metal
bracket to the chosen location, then slide the housing onto the bracket until it snaps into place. Run the cable
from the controller to the “Remote Bass” jack on the amplifi er chassis.
2011 ZX 700.5 RevB.indd 52011 ZX 700.5 RevB.indd 5 10/12/2010 10:41:54 AM10/12/2010 10:41:54 AM