


inputs
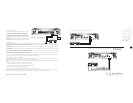
Electrical Wiring and Installation
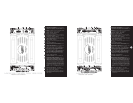
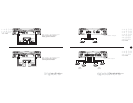
Low Level Stereo Input Connection
High Level Stereo Input Connection
Input Connections
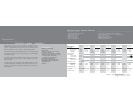
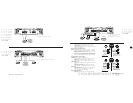
Making Power Connections
1. Connect the +12V terminal directly to the car battery (+) terminal.
2. Connect the GROUND terminal directly to the car battery (-)
terminal OR to a good clean, paint-free chassis ground point.
3. To ensure a good ground, and to prevent “motor-boating” noise
in the system, make an additional connection from the car battery
(-) terminal to the chassis of the stereo unit, using 12 gauge
minimum wire.
4. Connect the REMOTE terminal to an external switch for positive
12V turnon-off. This may be connected to the head unit power
antenna lead.
Installation Precautions
This amplifier comes complete with all mounting harware required. Please remember that this is a high-power unit, which generates considerable
electrical energy and heat. Therefore, be sure to install the unit in a place with sufficient airflow, a minimum of dust, and no moisture. Allow enough
space around the cooling fins to permit reasonable airflow and cooling.
• Before you drill or cut any holes, investigate your car’s layout very carefully. Take care when you work near the gas tank, fuel lines, hydraulic line
and electrical wiring.
• Do not operate the amplifier when it is unmounted. Attach all audio system components securely within the automobile to prevent damage, especially
in an accident.
• Do not mount this amplifier so that the wire connections are unprotected or in a pinched condition, or likely to be damaged by nearby objects. Be
sure to select a location inside your vehicle which has adequate ventilation.
• Before making or breaking power connections in your system, disconnect the vehicle battery. Confirm that your head unit or other equipment is
turned off while connecting the input jacks and speaker terminals.
• If you need to replace the power fuse, only replace it with a fuse identical to that supplied with the system. Using a fuse of a different type or rating
may result in damage to your system which isn’t covered by the manufacturer’s warranty.
Setting Up and Turning On Your New Amplifier
After all electrical connections have been made, and physical installation is complete, turn on your stereo and listen for the amplifier to turn on. If
there are any unusual noises from the speakers, turn the stereo off and recheck ALL wiring.
Assuming the amplifier turn on normally, you may have to adjust the LEVEL control(s) to match the output levels from your head unit. Follow these
steps:
1. Set the volume control on your head unit to about the 2/3 position.
2. Adjust the amplifier LEVEL control(s) to an average listening position.
3. Turn the head unit volume all the way down, and listen for background noise.
4. Start your vehicle, and again, listen for background noise.
5. By fine tuning the LEVEL control(s), you can reduce background and engine noise, if present.
These adjustments should only be made once. After that, use the head unit volume control to adjust the system volume, not the LEVEL control(s).
CAUTION: Never turn the LEVEL control(s) up any higher than you need to get clear sound at 2/3 volume on the head unit.
PLEASE NOTE! If using high level
inputs, do not use the low level
RCA inputs at the same time!
wiring harness
LRLR
from speaker terminals
head unit
orange
black
black
orange
L/R audio outputs
head unit
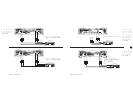
Electrical Connections
(all models)
5
2CH AMPS
LA
43
8
LA
53
8
LA
73
8
LA
93
8
LA
1438
LA
1838
LA
2038
to remote
turn-on
+12V
head unit
12V battery