7
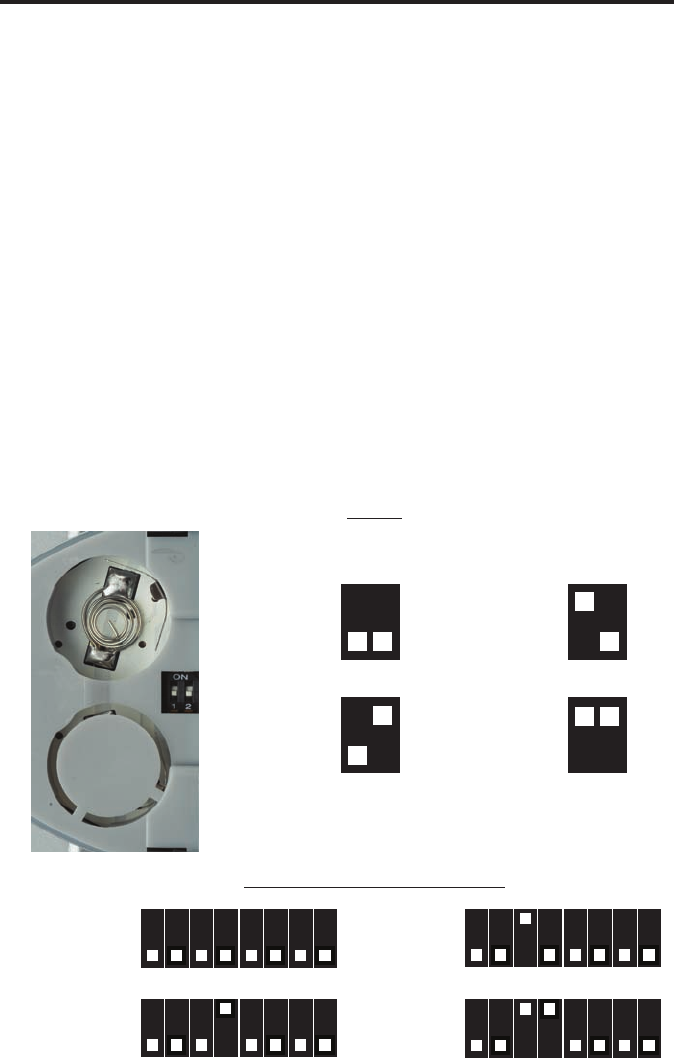
IR CODE CONFIGURATION
2:8 Distribution Amplifier for HDMI
Remote Channel 1:
Default
Remote Channel 4:
Remote
Remote Channel 1:
Default
1 2
Remote Channel 2:
1 2
Remote Channel 3:
1 2
Remote Channel 4:
1 2
How to Resolve IR Code Conicts
In the event that IR commands from other remote controls conict with the supplied RMT-2IR remote
control, changing the remote channel will alleviate this issue. The RMT-2IR remote control and the 2:8
Distribution Amplier for HDMI have DIP SWITCHES for conguring the remote channel that both units
use to communicate. These settings must match each other for proper operation. The 2 DIP SWITCH
bank on the RMT-2IR is located underneath the battery cover. The 8 DIP SWITCH bank for the 2:8
Distribution Amplier for HDMI is located inside of the unit. *DIP SWITCH 1 and 2 on the RMT-2IR
correspond to DIP SWITCH 3 and 4 on the 2:8 Distribution Amplier for HDMI.
NOTE: *DIP SWITCHES 1, 2, and 5 through 8 are not used on the 2:8 Distribution Amplier for HDMI.
Because the procedure for changing channels requires the main unit to be disassembled, this procedure
should only be done if there are IR conicts present in your setup.
Disconnect power from unit before starting. Remove all cabling from unit.
To open the 2:8 Distribution Amplier for HDMI Unit, remove all screws from the sides and underside of the
unit. Remove the hex nuts above each HDMI connector. Slide the unit apart carefully to expose the internal
PCB and the 8 DIP SWITCH bank.
When DIP SWITCH adjustments are complete, carefully slide the unit back together. Being careful not to
over tighten the hex nuts, screw them back in above each HDMI connector. Screw all of the screws from
the sides and underside of the unit back into the unit, again being careful not to over tighten the screws.
Plug all cabling back into its proper location on the unit. Reconnect power to the unit and test for IR
conicts.
1
2
3
4
5
6
7
8
Remote Channel 3:
1
2
3
4
5
6
7
8
Remote Channel 2:
1
2
3
4
5
6
7
8
1
2
3
4
5
6
7
8


