


16
Specifications
■
PANEL
Screen Size 8.4” Diagonal
Display Area (h x v) 170.469 x 127.872 mm
Aspect Ratio 4:3 Native (4:3/16:9 Modes)
Pixels 1024 x RGB x 768
Color Depth 24-bit (16,777,216 Colors)
Viewing Angle (h x v) 170° x 170°
Brightness 400 cd/m
2
Contrast Ratio 400:1
Dot Pitch (h x v) 0.0555 x 0.1665 mm
Pixel Pitch (h x v) 0.1665 x 0.1665 mm
■
VIDEO INPUT/OUTPUT
VGA Input
Supports RGBHV, RsGsBs, RGsB, RGB CS,
DVI Input
Supports Digital Signals Only (DVI-D)
HDMI, HDCP Supported
■
CONNECTORS
Video Input
VGA 1 x HD-15 Female
DVI 1 x DVI-I 29-Pin Female
Power Input
2-Pin Twist Lock Connector
Tally Interface
HD-15 Female
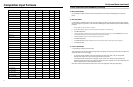
■
TALLY
3 LEDs (Green, Red, Yellow). Activation requires contact
closure of pin to ground on the HD-15 connector:
Pin No. Signal
1 M1 Green
2 M1 Red
3 M1 Yellow
4 Ground
5 Ground
6 N/C
7 N/C
8 N/C
9 N/C
10 N/C
11 M2 Green
12 M2 Red
13 M2 Yellow
14 Ground
15 Ground
■
ELECTRICAL
Power Consumption 3.5A @ 12VDC (42 W)
Voltage Requirement 12 VDC
V-PS12-5V-1 Power Supply:
Input 100V-240V, 1.5A, 50-60Hz
Output 12VDC, 5A, 60W Max
■
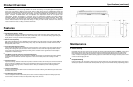
MECHANICAL
Dimensions (w x h x d): 18.92” x 7.00” x 2.02”
Weight (Monitor Only): 6.70 lbs
Operating Temperature 32°F to 120°F (0°C to 50°C)
Storage Temperature -4°F to120°F (-20°C to 50°C)
Compliance ₠, FCC-Class A, ANSI-63.4
(Certificates on file)
RoHs Do not dispose. Return to
Manufacturer or Authorized
Recycle Facility.
5
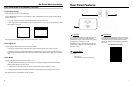
Installation and Initial Setup
■
Unpacking
Carefully unpack the V-R842DP-DVI monitor and verify that the following items are included:
• V-R842DP-DVI Monitor
• V-PS12-5V-1 Power Supply with 2-Pin Twist Lock Connector
• Operating Instructions
Inspect the unit for any physical damage that may have occurred during shipping. Should there be any damage,
immediately contact Marshall Electronics at (800) 800-6608. If you are not located within the continental United States,
call +1 (310) 333-0606.
■
Installation
The V-R842DP-DVI can be mounted in any standard EIA 19” equipment rack. Adequate ventilation is required when
installed to prevent possible damage to the monitor’s internal components.
■
Connections and Power-On
Plug the V-PS12-5V-1 power supply into an AC power source (100-240 V @ 50/60 Hz). Attach the 2-pin twist lock
connector to the back of the monitor. Please note that 12VDC can be also supplied directly to the monitor from a
variety of sources. The monitor will draw approximately 3.5 Amps at 12 Volts in operation.
Connect the required cables for video signal input and output.
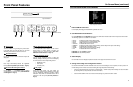
Each screen may be turned on by pressing the power button located on the front panel. Select a video input by
pressing the corresponding input select button.