


MTX.COM
4
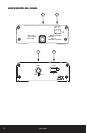
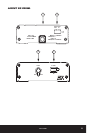
WIRING DIAGRAM
See page 22 for amplifier wiring diagrams.
INSTALLATION AND MOUNTING
MTX recommends your new Thunder Sports
™
amplifier be installed by a 12 volt installation specialist.
Any deviation from specified installation instructions can cause serious damage to the amplifier,
speakers and/or vehicle’s electrical system. Damage caused from improper installation is NOT
covered under warranty. Please verify all connections prior to system turn on.
1. Disconnect the vehicle’s negative battery cable.
2. Determine the mounting place for your MTX amplifier. Keep in mind there should be sufficient
air flow for proper cooling. Mark the mounting holes from the amplifier to be drilled. Before
drilling make sure all vehicle wires, gas lines, brake lines and gas tank are clear and will not
interfere with installation. Drill the desired holes and mount the MTX amplifier.
3. Install a positive (+) power cable from the vehicle’s battery through the firewall using a grommet
or firewall bushing to avoid cable damage from sharp edges of the firewall. Run the cable through
the interior of the vehicle and connect it to the amplifier’s +12V wire. Do not connect to the
battery at this time. NOTE: Use only proper gauge wire for both positive and negative connections.
4. Install a circuit breaker or fuse within 18 inches of the battery. This effectively lowers the risk
of severe damage to you or your vehicle in case of a short circuit or accident. Make sure the
circuit breaker is switched Off or the fuse is taken out of the fuse holder until all connections are
made. Now connect your positive power cable to the positive battery terminal of the battery.
5. Grounding - Locate a proper ground point on the vehicle’s chassis and remove all paint, dirt or
debris to reveal a bare metal surface. Attach the amplifier’s ground wire to that contact point.
If a suitable location is not available connect this terminal to the vehicle’s negative battery
terminal.
6. Connect a Remote Turn-On wire from the source unit to the MTX amplifier’s (REM) wire. If the
source unit does not have a dedicated Remote Turn-On lead, you may connect to the source unit’s
Power Antenna lead.
7. Supply the signal to your MTX amplifier by connecting the signal cables using high quality RCA to
the corresponding outputs at the source unit or speaker leads and inputs of the amplifier.
8. Connect your speakers to your MTX amplifier’s speaker wires using the correct gauge
speaker wire. Your MTX amp can drive a 2Ω stereo/4Ω bridged minimum load for optimum power.
9. Double check all previous installation steps, in particular, wiring and component connections.
Once verified, reconnect the vehicle’s negative battery cable, turn the circuit breaker On or place
the fuse in the fuse holder.
NOTE: Gain Levels on the amplifier should be turned all the way down (counter clockwise) before
proceeding with adjustments.