


English-10
Controls
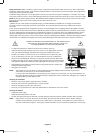
OSD (On-Screen Display) control buttons on the front of the monitor
function as follows:
To access the OSD menu, press the EXIT button. To change the signal input, press the SELECT button.
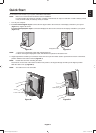
All buttons are located at the back of the monitor.
The Key Guide appears pressing any button when not in the OSD control menu.
NOTE: The OSD must be closed in order to change the signal input.
3. Control Buttons
ABCDE
4
5
1
6
2
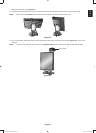
1 KEY GUIDE The Key Guide appears on the screen when the OSD control menu is accessed.
The Key Guide will rotate when the OSD control menu is rotated.
Perform along the notifi cation of each key.
NOTE: The KEY GUIDE appears as follows:
• KEY GUIDE when OSD menu is displayed.
• KEY GUIDE when HOT KEY is set to OFF.
• KEY GUIDE when HOT KEY is set to ON.
Each KEY GUIDE works as follows:
- Exits any OSD sub menu.
Exits the OSD Control menu.
- Shows OSD menu.
- Shows PICTURE MODE.
- Selects the item.
- Changes the input source.
- Resets the OSD back to factory settings.
- Shows the quick screen QA test pattern.
2 LED Indicates that power is on.
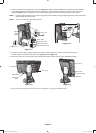
3 Control Buttons A. RESET button
NOTE: When not in the OSD control menu, press the RESET button for at least 3 seconds
to display the quick screen QA test pattern (grayscale) drawing and check the display
performance.
B. SELECT button
C. UP/DOWN button
D. LEFT/RIGHT button
E. EXIT button
4 AMBIENT LIGHT Sensor Detects the level of ambient light, allowing the monitor to make adjustments to various
settings. Do not cover this sensor (See page 17, CD-ROM Version).
5 FRONT SENSOR Detects screen luminance changes over time.
Used for luminance stabilization, standalone (Self Calibration, Gamma Adjust, DICOM
Measurement) and network (Gamma Adjutst, DICOM Measurement) controlled calibrations
and conformance tests.
6 SENSOR PORT For optional external sensor used for self calibration and copy calibration.
MD211G3 paper manual.indb 10MD211G3 paper manual.indb 10 3/27/12 11:18:32 AM3/27/12 11:18:32 AM