


© 2009 Directed Electronics. All rights reserved. 19
slight distortion and turn the level control back slightly for an
undistorted output. Depending on your system, the midrange and
tweeter output may be on the same output channels.
Turn up the level control corresponding to the tweeter output 6.
until you hear slight distortion and turn back the level control
slightly for an undistorted output. Depending on your system
the midrange and tweeter output may be on the same output
channels.
Fine-tune the output level between midrange and tweeters. 7.
Refer to the Internal Crossover Configuration section of this
manual for detailed instructions.
Repeat Steps 5-7 for the rear speakers. If you do not have rear 8.
speakers continue to Step 10.
Set levels between the front and rear midrange and tweeters for 9.
optimum front/rear balance.
Turn up the level control corresponding to the woofer output 10.
until you hear slight distortion and turn back the level control
slightly for an undistorted output.
Fine-tune the output level between satellite speakers and the 11.
woofers. Refer to the Internal Crossover Configuration section of
this manual for detailed instructions.
Enjoy your awesome Orion sound system.12.
!MPLIFIER6ISUAL4ROUBLESHOOTING
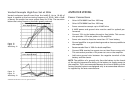
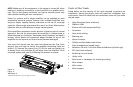
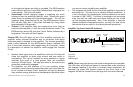
Your new Orion HCCA amplifier has three indicator lights (LED’s) on
the top cover of the amplifier as seen in the next figure. These lights
are very useful in trouble shooting possible amplifier problems and
issues.
Power LED: This LED lights up green when the amplifier is turned on.
This represents normal operation if the Protection/ESP Status LED is on
solid, and the Thermal LED is off.
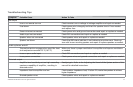
ESP/Protection Status Indicator LED: This LED lights up blue when
the amplifier is turned on and periodically blinks as a normal default
state. When the amplifier goes into protection it will flash a specific
number of times (described below) indicating the source of the event.
It will also flash when the amplifier is powering up, approximately 4-5
flashes until the turn-on delay has expired (actual number of flashes
depends on the length of time selected via the bitwriter). Below is
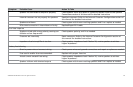
a description of reasons the amplifier could engage the protection
circuit. While most protection modes are self-resetting when the
problem is resolved, short or overcurrent latches and power must be
cycled off/on to restore operation. The protection indications will self-
reset once the condition has been fixed. Advanced troubleshooting
can be performed using the ESP/Protection Status indicator LED.
Short:s Speaker wires pinched or shorted together or to ground
(frame of vehicle). ESP/Protection Status LED will also flash 2 short
flashes, followed by a long pause (approximately 8-10 seconds).
Overcurrent:s Check for possible speaker issue(s) or speaker wiring
pinched in a door or other metal. Make sure speaker(s) load is
not below minimum 2Ω load. The ESP/Protection Status LED will
also flash 2 short pulses, followed by a long pause.
DC Offset:s This can happen if the installation inadvertently
connects the power wire to the speaker input(s). This can also
happen if the amplifier has an internal problem. The amplifier
will flash 4 short pulses, followed by a long pause, then repeat.
Undervoltage:s Vehicle charging system is not supplying enough
voltage to the amplifier. This can also occur if you use too small
a gauge wire or the terminals connecting the amplifier power