


© 2010 directed electronics—all rights reserved 3
FINDING SPEAKER MOUNTING LOCATIONS
Choosing the correct speaker locations will have the greatest effect on the sound quality of the
system. Different considerations are needed when choosing the locations that best suit your
needs. The locations must be large enough for the speakers to fit. Care is needed to ensure that
the location you have chosen will not affect any of the mechanical or electrical operations of
the vehicle.
Determining the best location for the speakers will depend on your cosmetic needs and your
vehicle's interior. If minimal intrusion in your vehicle is desired, factory speaker locations may
be the ticket for you. Placing the speaker in the factory location can often give very desirable
results.
DOOR MOUNTING
When checking for possible speaker locations in the doors, check the operation of the window
and all assemblies. There is also a stabilizer stop bar in between the door and the door jamb.
This bar prevents the door from opening too far. Many shade tree installers overlook this and
check for clearance only when the door is fully open.
REAR DECK MOUNTING
In rear deck installations, check the operation of the trunk suspension springs or tension bars.
These tension bars move in the opening and closing of the trunk. You cannot be too cautious
during this part of the installation, In addition, do not locate the speakers too close to the back
of the rear deck. Installing the far screws will only be possible with the removal of the rear
window.
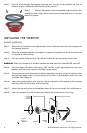
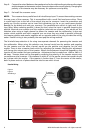
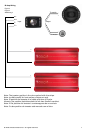
INSTALLING THE MID/WOOFERS
Step 1: Determine where the speakers will be mounted. Make sure there is a flat area large
enough for the speakers to fit properly. An uneven mounting surface can damage the
driver.
Step 2: Check to make sure the space you have chosen for the speakers will not interfere with
the operation of the vehicle.
Step 3: Using the supplied template guide, mark the mounting hole and mounting screw hole
locations with a pen for each speaker.
Step 4: Cut the holes for the speaker. When using correctly sized factory locations, this step
can be passed. A hole can be cut either with a pair of metal tin snips, an air or jig saw,
or with a hole saw corresponding to the size of the midrange listed below.
• 5-5/8” Hole Saw (6-1/2” mid/woofer installation)
• 4-3/4" Hole Saw (5-1/4" mid/woofer install.)
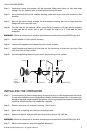
WARNING: Check for clearance of window mechanisms and electrical wires BEFORE you drill.
Step 5: Run the speaker wire to the speakers. Make sure to keep wires away from sharp metal
or other edges. When passing through metal, use a protective grommet.
Step 6: Pre-drill mounting screw holes using a 1/8" drill bit.
WARNING: Check for clearance of window mechanisms and electrical wires BEFORE you drill.