


© 2008 directed electronics—all rights reserved 5
FULL FLUSH MOUNTING
Step 1: Determine where the tweeter will be mounted. Make sure there is a flat
area large enough for the tweeter and no obstructions behind the area.
Step 2: Using supplied template mark with a pen the hole needed for the tweeter.
Step 3: Be sure the hole is large enough for the tweeter housing.
Step 4: Cut the hole for the tweeter. When using factory locations, this step can be
skipped. A hole can be cut either with a pair of metal tin snips or a 2" hole
saw for soft materials or 2-1/8" hole saw for hard materials.
WARNING: Check for clearance of window mechanisms and electrical wires
BEFORE you drill.
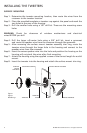
Step 5: Install tweeter in flush mount housing.
Step 6: Connect the speaker wires observing the correct polarity.
Step 7: Install tweeter and housing in the hole cut for mounting, so that the trim
ring is flat with the front of the surface.
Step 8: Use the supplied x bracket to secure the housing to the surface.
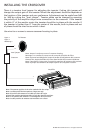
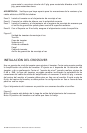
Flush Mount
Tweeter Assembly
Tweeter
Cup
X Bracket
Tweeter
Wire
Flush Mount
Trim Ring
Wiring
Harness
Panel
Screw
Figure 2
Figura 2
Abbildung 2