19
Appendix
Appendix
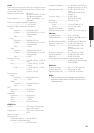
Troubleshooting
➲ About troubleshooting other than description
below ➞ Appendix of the Operation Manual
Symptom Cause Action (See)
There’s no picture. The parking brake cord is not connected. Connect a parking brake cord, and apply the
parking brake.
The parking brake is not applied. Connect a parking brake cord, and apply the
parking brake.
The icon is dis-
played, and operation
is not possible.
The operation is prohibited for the disc. This operation is not possible.
The operation is not compatible with the
disc’s organization.
This operation is not possible.
The picture stops
(pauses) and the unit
cannot be operated.
Reading of data has become impossible
during playback.
After pressing 77
77
once, start playback once
more.
The picture is
stretched, the aspect is
incorrect.
The aspect setting is incorrect for the dis-
play.
Select the appropriate setting for your dis-
play. (Page 15)
Rear display picture
disappears.
• The source disc being listened to with the
product has been ejected.
• The REAR button was pressed and REAR
ON mode switched off.
• There was a problem with the rear display
or a faulty wiring connection, for example.
• Rear View is selected on the screen.
• When the shift lever is in [R], displays rear
view camera images. (When “NAVI” is
selected in REAR DISP menu.)
• Before ejecting the disc, switch the
source. This problem may occur when cer-
tain connection methods are used.
• Press the REAR button to turn REAR ON
mode on.
• Check the rear display and its connection.
• Select view mode other than Rear View.
• Move the shift lever other than turn [R] po-
sition. (Select SOURCE in REAR DISP
menu.)
Nothing is displayed
and the touch panel
keys cannot use.
The setting for the rear view camera is in-
correct.
The shift lever was placed in [R] when the
rear view camera was not connected.
Connect a rear view camera correctly.
Press NAVI/AV button to return to the
source display and then select the correct
setting for CAMERA.
➲ About CAMERA setting
➞ Operation
Manual
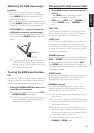
LCD Panel knocking
against your vehicle’s
console or dashboard.
Incorrect setting of angle. Press ANGLE (+/–) to adjust the LCD an-
gle. Forcibly adjusting the LCD panel by
hand may damage it.
Video image appears
grainy.
This happens when videos are viewed in
CINEMA or ZOOM mode.
Select a different mode to view videos.