


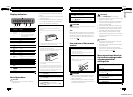
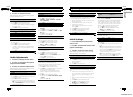

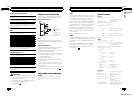

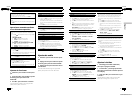

Display indication
4 5
6
3
8
a
b
9
1
2
7
Indicator State
1
Main dis-
play sec-
tion
! Tuner: band and frequency
! Program service name
! Built-in CD player and USB:
elapsed playback time and
text information
2 c
An upper tier of folder or menu
exists.
3 d
A lower tier of folder or menu ex-
ists.
4
(list) The list function is operated.
5
(artist)
The disc (track) artist name is dis-
played.
6
(disc)
The disc (album) name is dis-
played.
7
(song)
The track (song) name is dis-
played.
A playable audio file has been se-
lected while operating the list.
8 LOC The local seek tuning is on.
9
(repeat) Track or folder repeat is on.
a
(ran-
dom)
Random play is on.
b
(sound re-
triever)
The sound retriever function is
on.
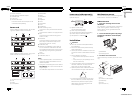
Basic Operations
Important
! Handle gently when removing or attaching
the front panel.
! Avoid subjecting the front panel to excessive
shock.
! Keep the front panel out of direct sunlight and
high temperatures.
! To avoid damage to the device or vehicle inter-
ior, remove any cables and devices attached
to the front panel before detaching it.
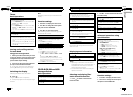
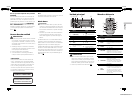
Removing the front panel to protect your unit from
theft
1 Press the detach button to release the front
panel.
2 Push the front panel upward and pull it toward
you.
3 Always keep the detached front panel in a protec-
tion device such as a protection case.
Re-attaching the front panel
1 Slide the front panel to the left.
Make sure to insert the tabs on the left side of the
head unit into the slots on the front panel.
2 Press the right side of the front panel until it is
firmly seated.
If you cannot attach the front panel to the head
unit successfully, make sure that you are placing
the front panel onto the head unit correctly. For-
cing the front panel into place may result in da-
mage to the front panel or head unit.
Turning the unit on
1 Press S (SRC/OFF) to turn the unit on.
Turning the unit off
1 Press S (SRC/OFF) and hold until the unit turns
off.
Selecting a source
1 Press S (SRC/OFF) to cycle between:
TUNER (tuner)—CD (built-in CD player)—USB
(USB)—AUX (AUX)
En
4
Section
02
Operating this unit
Adjusting the volume
1 Turn M.C. to adjust volume.
Turning the display off and on
1 Press
/DISP OFF and hold until the display
turns off and on.
CAUTION
For safety reasons, park your vehicle when remov-
ing the front panel.
Note
When this unit’s blue/white lead is connected to
the vehicle’s auto-antenna relay control terminal,
the vehicle’s antenna extends when this unit’s
source is turned on. To retract the antenna, turn
the source off.
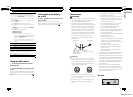
Use and care of the remote
control
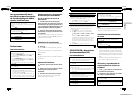
Using the remote control
1 Point the remote control in the direction of the
front panel to operate.
When using for the first time, pull out the film
protruding from the tray.
Replacing the battery
1 Slide the tray out on the back of the remote con-
trol.
2 Insert the battery with the plus (+) and minus (–)
poles aligned properly.
WARNING
! Keep the batter y out of the reach of children.
Should the battery be swallowed, consult a
doctor immediately.
! Batteries (battery pack or batteries installed)
must not be exposed to excessive heat such
as sunshine, fire or the like.
CAUTION
! Use one CR2025 (3V) lithium batter y.
! Remove the battery if the remote control is not
used for a month or longer.
! There is a danger of explosion if the battery is
incorrectly replaced. Replace only with the
same or equivalent type.
! Do not handle the battery with metallic tools.
! Do not store the battery with metallic objects.
! If the battery leaks, wipe the remote control
completely clean and install a new battery.
! When disposing of used batteries, comply
with governmental regulations or environmen-
tal public institutions’ rules that apply in your
country/area.
Important
! Do not store the remote control in high tem-
peratures or direct sunlight.
! The remote control may not function properly
in direct sunlight.
! Do not let the remote control fall onto the
floor, where it may become jammed under the
brake or accelerator pedal.
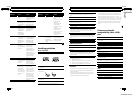
Menu operations identical
for function settings/audio
adjustments/initial
settings/lists
Returning to the previous display
Returning to the previous list (the folder one level
higher)
1 Press
.
Returning to the main menu
Returning to the top tier of list
1 Press and hold
.
Returning to the ordinary display
Canceling the initial setting menu
1 Press B(BAND/ESC).
Returning to the ordinary display from the list
1 Press B(BAND/ESC).
En
5
English
Section
02
Operating this unit
<CRD4530-A/N>3