


IMPORTANT!
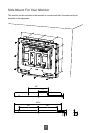
The wall mounting instructions are for the qualifi ed wall mounting person only!
!
Warning!
Please select the proper screws!
The distance between the back cover surface and the bottom of the screw hole
is 8 mm. Please use four M4 screws diameter with proper length to mount your
monitor.
Please note: the mounting stand must be able to support at least 13.2 lbs (6Kg).
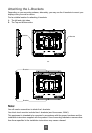
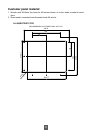
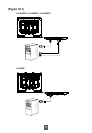
Connecting the Display (Figure 10.1)
To setup this display, please refer to the following fi gure and procedures.
1. Be sure all equipment is turned off.
2. Connect the DC adapter to the power connector on the monitor and the other end into
an electrical outlet (10.1).
3. Connect the D-SUB cable from the display’s VGA input connector to the D-SUB
connector of your host computer and tighten the screws (10.1).
4. Connect the RS-232 or USB cable from the RS-232 or USB port of your display to the
RS-232 port (10.1) or USB port (10.1) of your computer.
5. Confi gure the touch screen. Refer to the “Touch Screen Driver Installation” section on
page 18.
6. Once the touch screen is confi gured, the monitor is ready for use.
7. Connect the remote control cable to RJ11 port (10.1) (optional).
!
Notice!
To ensure the LCD display works well with your computer, please confi gure the
display mode of your graphics card to make it less than or equal to 1280 x1024
resolution and make sure the timing of the display mode is compatible with the
LCD display.
We have listed the compatible “Video Modes” of your LCD display in the appendix
(on page 17) for your reference.
Don’t connect telephone or internet cable to RJ-11 port.
Adapter rating:12Vdc 4A min., marked with LPS.
9