8
POLK/MOMO: CHAMPIONSHIP PERFORMANCE WWW.POLKAUDIO.COM/AMPS
9
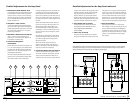
Typical Installation, continued
For the ground connection, also use the largest gauge cable available. Connect to the terminal
marked GND and then connect this cable directly to your car’s chassis. Keep the length of the
GND connection as short as possible, ideally under 6", to avoid ground loops and engine noise
hum problems. Make certain that the ground point is directly connected to the car’s metal
chassis, with no dirt or paint getting in the way of a clean metal-to-metal connection.
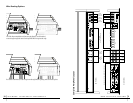
7. SECURELY install the amplifier in your chosen location.
Take the time to secure the amplifier solidly so that it does not come loose in the event of a
collision or sudden jolt to the vehicle. Warning: Low Flying Amp!
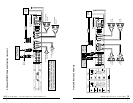
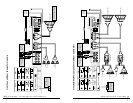
8. CONNECT the positive and negative power wires to the amplifier. A fuse near the amplifier
is not necessary.
9. CONNECT the remote turn-on wire to the amplifier.
10. CONNECT the RCA signal input cables to the amplifier.
11. CONNECT the speaker wires to the amplifier.
Make sure to use speaker wire of at least 16 gauge or thicker.
Be certain to maintain correct polarity. One of the terminals on the rear of your speaker is posi-
tive (+) and the other is negative (-). Make certain that you connect the wire from the positive
(+) terminal of your amplifier to the positive (+) terminal on your speaker, and the wire from
the negative (-) terminal of your amplifier to the negative (-) terminal on your speaker. Most
speaker wire has some indicator (color code, ribbing, or printing) on one of the two wires to
help you maintain consistency.
Make certain that no bare wire ends touch each other. Such contact could result in an electri-
cal short and cause your head unit or amplifier to turn off or malfunction.
12. Carefully review the amplifier’s control settings to make sure that they are set according to the
needs of your system.
13. Now install the power wire fuse and reconnect the negative battery post terminal. (See your
authorized Polk AutoSound Dealer for professional advice on fuses and circuit breakers.)
14. Turn on the head unit at low level to check that the amplifier is configured correctly. Resist the
temptation—RESIST!—to crank it up until you have verified the control settings and made
your fine tunings.
15. Make the necessary adjustments to the input sensitivity to obtain the right overall output and
the desired balance between the two pairs of channels and other amps in your system.
ADDITIONAL STEPS AND DIFFERENT PROCEDURES MAY BE REQUIRED IN SOME APPLICA-
TIONS. IF YOU HAVE ANY QUESTIONS, PLEASE CONTACT YOUR AUTHORIZED POLK AUDIO
AUTOSOUND DEALER OR POLK AUDIO CUSTOMER SERVICE.
Typical Installation
ALWAYS DISCONNECT YOUR VEHICLE’S BATTERY GROUND BEFORE WORKING WITH YOUR
VEHICLE’S ELECTRICAL SYSTEM.
ALWAYS BE AWARE OF THE LOCATION OF HIDDEN WIRES, CABLES AND FLUID LINES BEFORE
DRILLING HOLES OR MAKING CONNECTIONS.
1. DISCONNECT the negative battery post connection and secure the disconnected cable away from
the battery to prevent “accidental re-connection” during the installation process. This is not an
option. Just do it, Ben Franklin.
2. RUN power wire from the engine compartment to the amplifier installation location, taking care
to route it in such a way that it will not be damaged and will not interfere with vehicle operation.
Your amp will need to draw large levels of current, so use the largest gauge power/ground cable
available; we recommend at least 8 AWG. (See your authorized Polk AutoSound Dealer for power
cables and wire connectors.) Don’t forget to protect your vehicle with a circuit breaker or fuse
placed no more than 12" (30cm) from your battery. This circuit breaker or fuse should be no
greater than the fuse(s) of your amplifier for optimal protection. For example, this Polk Audio
Amplifier has two 30A fuses. Your “vehicle protection” fuse should be rated at 60A. (See your
authorized Polk AutoSound Dealer for professional advice on fuses and circuit breakers.)
3. CONNECT power wire with EMPTY fuse holder to the positive battery post. Do not install the
fuse itself until the power wire has been connected to the amplifier.
4. RUN signal cables and remote turn-on wire from the head unit to the amplifier mounting
location.
Use high quality RCA cables for signal connections. The remote turn-on connection allows the
amplifier to be turned on and off with the power control of your head unit. Use smaller cable
here, 16 gauge is probably best. (See your authorized Polk AutoSound Dealer for professional
advice on cables and connectors.)
Make sure that the cables for power and audio signal are not on the same side of the vehicle and
that they do not cross each other; this will help reduce any noise that may radiate from the power
cable to the signal cable. If an audio signal cable is too close to a power cable, it may pick up the
magnetic field generated by the power cable, which could lead to a loss of quality in your signal.
5. RUN speaker wire from the speakers to the amplifier installation location.
Measure enough wire to reach from your amplifier to each speaker or inline crossover, plus an
additional 12" to allow moving the speakers or equipment without having to disconnect the wires.
6. FIND a good solid metal grounding point close to the amplifier and connect the negative power
wire to it.


